According to a biannual Security Intelligence Report from Microsoft, AutoRun—the feature in Windows that automatically executes files when you plug in a USB or connect to a network—accounts for almost half of all malware infections. That's really damn high.
To be clear, these are infections that don't require any user-input from you, so it's kind of not your fault that your computer gets infected. By turning off AutoRun, you'll add an extra step to certain tasks, but it's worth it to cut down on malware 50%.
What's also interesting in this report is that Windows XP SP3 systems get infected about ten times as much as Windows 7 SP1 64-bit systems, and six times as much vs. 32-bit Windows 7 systems. That alone is one reason why you might want to upgrade your parents' machines to Windows 7.
The easiest way to disable AutoRun is to download a free utility like Disable AutoRun or previously mentioned Panda USB Vaccine,
run it, and call it a day (these apps are made specifically to turn off
AutoRun). On the other hand, if you're comfortable with editing the
registry, here's a quick guide to doing it yourself.
11/20/11
4 Security Issues SMBs Should Watch In 2012
1. Masses will migrate to cloud platforms. This prediction seems to lean a little hard on retrospect--except that Morris is talking about John and Jane Doe--not businesses. Morris tied his prediction to Apple's recent iCloud launch and said it will make online applications the public norm rather than a trend. Continued consumerization will, in turn, force IT pros to deal with cloud applications--and any inherent security concerns--whether they want to or not.
Morris isn't talking about things like Web-based email--already somewhat old-fashioned in 2011--but file sharing, storage, and a much broader range of tools. Many tech-savvy SMBs are well ahead of this curve, but there are no doubt firms that have stayed away for security or other reasons. A potential silver lining: If a broader range of cloud platforms goes mainstream, then (hopefully) there'll be more onus on vendors to invest in security--if for no other reason than the increasing cost of a breach and the ensuing PR fallout.
2. Your smartphone will be a target. If you're placing bets, this one is easy money. Morris gives a general pat on the back to the security industry here, saying that because it has done a good job of protecting traditional endpoints, the bad guys will gold-rush the mobile frontier. "We will see an increase in Android and iPhone attacks: rogue apps, malicious links, and spyware targeted at smartphones and tablets," he said. "It's all about data, and business users and consumers alike store an abundance of highly sensitive and poorly guarded information on their mobile devices." SMBs need a mobile arm to their security plans that deals with both the devices themselves and the apps that run on them. Speaking of which...
3. Legitimate applications will be used for illegitimate activities. The cynic might say: "Duh." Just this week, Facebook--how many of your employees aren't using it?--got hit with a widespread porn attack. Morris is more concerned about the vast, growing universe of mobile apps in use on employee smartphones and tablets--whether those are company-supported or not. "A simple glance at an application like Plane Finder illustrates the vast amount of data that is at anyone's fingertips," he said.
4. Our weakest link will be strengthened. Morris has faith in humanity: He thinks we'll get smarter about security practices in 2012: "Indifference toward security will diminish." That's an interesting one for SMBs--their innate agility and leaner staff should make it easier to educate users on both the fundamentals and evolving problems. Yet SMBs--just like much larger concerns--run into problems all of the time, often as the result of human error. But it's not like this will just magically happen once the ball drops at midnight on January 1. It requires a philosophical shift--one that need not depend on a big budget. Is Morris right--will we get smarter next year? Let's hope so.
Ref:-Informationweek
How to Turn Your Webcam Into a Streaming, Motion-Detecting Surveillance System
You don't need expensive software or a new camera to keep an eye on
things at home. Whether you're looking after your dog or trying to catch
burglars in the act, you can put together a home security system with a
regular webcam and your PC.
More Details:-
More Details:-
1/26/11
Access list syslog correlation
ACL syslog correlation is a Cisco IOS feature which provides the ability to identify which access list entry (ACE) was responsible for a permit or deny action appearing in syslog.
Consider the following access list applied to filter externally-sourced traffic destined for the internal network:
When an inbound packet is matched and discard by rule 50, the following syslog message is generated:
Here we enable hash generation and add a few more ACEs to our ACL:
Consider the following access list applied to filter externally-sourced traffic destined for the internal network:
Router# show ip access-lists Extended IP access list EXTERNAL->INTERNAL 10 permit icmp any any echo-reply 20 permit udp any eq domain any 30 permit tcp any any established 40 permit tcp any host 172.16.0.202 eq www 50 deny tcp any any eq 22 log 999 deny ip any anyLines 10 through 40 allow miscellaneous traffic types in, and line 50 explicitly denies inbound traffic destined to TCP/22 for the purpose of logging. Line 60 defines an explicit "deny any"; this isn't required, but included here for clarity.
When an inbound packet is matched and discard by rule 50, the following syslog message is generated:
%SEC-6-IPACCESSLOGP: list EXTERNAL->INTERNAL denied tcp 10.0.0.2(57289) -> 10.0.0.1(22), 1 packetThis log message informs the administrator of the action taken and the ACL which matched the packet, but in some cases we may want more detail readily available. This is where ACL hash correlation comes in handy. We can redefine the ACL rule to include an arbitrary keyword, up to 64 characters in length:
Router(config)# ip access-list ext EXTERNAL->INTERNAL Router(config-ext-nacl)# 50 deny tcp any any eq 22 log Deny_SSH Router(config-ext-nacl)# ^Z Router# show ip access-lists Extended IP access list EXTERNAL->INTERNAL 10 permit icmp any any echo-reply 20 permit udp any eq domain any 30 permit tcp any any established 40 permit tcp any host 172.16.0.202 eq www 50 deny tcp any any eq 22 log (tag = Deny_SSH) 999 deny ip any anyNow when that rule discards a packet, its log message includes our tag:
%SEC-6-IPACCESSLOGP: list EXTERNAL->INTERNAL denied tcp 10.0.0.2(54843) ->
10.0.0.1(22), 1 packet [Deny_SSH]These tags can be reused by multiple ACEs. Continuing our example, say we also want to deny traffic to SSH servers running on an alternate port, TCP/2222:Router(config)# ip access-list ext EXTERNAL->INTERNAL
Router(config-ext-nacl)# 60 deny tcp any any eq 2222 log Deny_SSH
Router(config-ext-nacl)# ^Z
Router# show ip access-lists
Extended IP access list EXTERNAL->INTERNAL
10 permit icmp any any echo-reply
20 permit udp any eq domain any
30 permit tcp any any established
40 permit tcp any host 172.16.0.202 eq www
50 deny tcp any any eq 22 log (1 match) (tag = Deny_SSH)
60 deny tcp any any eq 2222 log (tag = Deny_SSH)
999 deny ip any anyACL logging tags are great for readily identifying ACE matches, particularly when you expect certain matches to occur, but manually defining a tag for each ACE isn't always practical. This is especially true when you want to maintain syslog correlation among hundreds or thousands of individual ACL rules. In such cases, automatically generated hashes would be the preferred option. Automatic hashing is enabled globally, and applied to any ACE with the log keyword with no argument following it.Here we enable hash generation and add a few more ACEs to our ACL:
Router(config)# ip access-list logging hash-generation Router(config)# ip access-list extended EXTERNAL->INTERNAL Router(config-ext-nacl)# 70 deny tcp any any eq 1000 log Router(config-ext-nacl)# 80 deny tcp any any eq 2000 log Router(config-ext-nacl)# 90 deny tcp any any eq 3000 log Router(config-ext-nacl)# ^Z Router# show ip access-lists Extended IP access list EXTERNAL->INTERNAL 10 permit icmp any any echo-reply 20 permit udp any eq domain any 30 permit tcp any any established 40 permit tcp any host 172.16.0.202 eq www 50 deny tcp any any eq 22 log (1 match) (tag = Deny_SSH) 60 deny tcp any any eq 2222 log (tag = Deny_SSH) 70 deny tcp any any eq 1000 log (hash = 0x594F8697) 80 deny tcp any any eq 2000 log (hash = 0xE471528C) 90 deny tcp any any eq 3000 log (hash = 0x34CC0DD6) 999 deny ip any anyAs expected, a trigger by any of the ACEs with a hash appended works just as it does with tags:
%SEC-6-IPACCESSLOGP: list EXTERNAL->INTERNAL denied tcp 10.0.0.2(21196) -> 10.0.0.1(1000), 1 packet [0x594F8697]While not immediately useful, a hash can be used to filter an ACL configuration and quickly identify the ACE responsible for an action:
Router# show ip access-lists EXTERNAL->INTERNAL | include 594F8697 70 deny tcp any any eq 1000 log (1 match) (hash = 0x594F8697)
Displaying an SSH Pre-login Banner
Recently, someone expressed difficulty with displaying a pre-login banner on an IOS device when connecting via SSH. Most of us are no doubt familiar with IOS' message of the day (MOTD) banner, which originated in the UNIX world. However, IOS supports several types of banners, which can get confusing:
Typically, you'll want to define at least a login banner, to provide the de facto yet tautological "unauthorized use is unauthorized" warning. An exec banner can additionally be defined to provide potentially sensitive information only after a user has authenticated.
Router(config)# banner ? LINE c banner-text c, where 'c' is a delimiting character exec Set EXEC process creation banner incoming Set incoming terminal line banner login Set login banner motd Set Message of the Day banner prompt-timeout Set Message for login authentication timeout slip-ppp Set Message for SLIP/PPPThe IOS documentation provides a bit of detail on each of the different types, but the two types we're most concerned with are the login and exec banners. The MOTD banner is in fact not an ideal banner to use as it is not displayed consistently for both Telnet and SSH connections:
| Banner | Telnet | SSHv1 | SSHv2 |
| motd | Displayed before login | Displayed after login | Displayed after login |
| login | Displayed before login | Not displayed | Displayed before login |
| exec | Displayed after login | Displayed after login | Displayed after login |
banner exec ^C You have logged in to $(hostname).$(domain). ^C banner login ^C ############################################################### # # # THIS SYSTEM IS PROVIDED FOR USE BY AUTHORIZED USERS ONLY. # # # ############################################################### ^CThis will result in the same behavior whether logging in via Telnet or SSHv2:
stretch@Sandbox ~ $ telnet 192.168.10.1 Trying 192.168.10.1... Connected to 192.168.10.1. Escape character is '^]'. ############################################################### # # # THIS SYSTEM IS PROVIDED FOR USE BY AUTHORIZED USERS ONLY. # # # ############################################################### User Access Verification Username: stretch Password: You have logged in to Demarc.home. Demarc# quit Connection closed by foreign host. stretch@Sandbox ~ $ ssh stretch@192.168.10.1 ############################################################### # # # THIS SYSTEM IS PROVIDED FOR USE BY AUTHORIZED USERS ONLY. # # # ############################################################### Password: You have logged in to Demarc.home. Demarc#
Cisco Tips
Keyboard shortcuts
These shortcuts can be used to speed up operating with the CLI:| Ctrl+B or Left | Move the cursor one character to the left | ||
| Ctrl+F or Right | Move the cursor one character to the right | ||
| Esc, B | Move the cursor one word to the left | ||
| Esc, F | Move the cursor one word to the right | ||
| Ctrl+A | Move cursor to the beginning of the line | ||
| Ctrl+E | Move cursor to the end of the line | ||
| Ctrl+P or Up | Retrieve last command from history | ||
| Ctrl+N or Down | Retrieve next command from history | ||
| Ctrl+T | Swap the current character with the one before it | ||
| Ctrl+W | Erase one word | ||
| Ctrl+U | Erase the entire line | ||
| Ctrl+K | Erase all characters from the current cursor position to the end of the line | ||
| Ctrl+X | Erase all characters from the current cursor position to the beginning of the line | ||
| Ctrl+L | Reprint the line | ||
| Ctrl+C | Exit configuration mode | ||
| Ctrl+Z | Apply the current command and exit configuration mode |
Filter output
Most show commands support filtering with the pipe (|) character, allowing a user to display only the information he's looking for.Switch# show interface status | include notconnect Gi1/0/7 notconnect 1 auto auto 10/100/1000BaseTX Gi1/0/9 notconnect 1 auto auto 10/100/1000BaseTX Gi1/0/22 notconnect 1 auto auto 10/100/1000BaseTXFilter options are include, exclude, and begin. The remaining characters after one of these filter types is processed as a regular expression, which could be a simple string (as in the example above) or something a bit more complex. The example below demonstrates filtering for interface numbers and any assigned IP addresses.
Switch# show run | inc ^interface|ip address interface FastEthernet0 ip address 192.168.0.1 255.255.255.0 interface FastEthernet1 interface FastEthernet2 ip address 192.168.1.1 255.255.255.0 ip address 192.168.2.1 255.255.255.0 secondary interface FastEthernet3You can also filter by section. Thanks to Carl Baccus to reminding me to include this.
R1# show run | section bgp router bgp 100 no synchronization redistribute connected neighbor 172.16.0.2 remote-as 200 neighbor 172.16.0.9 remote-as 300 no auto-summary
Skip through the configuration
You can begin viewing a configuration with thebegin filter:Router# show run | begin interface interface FastEthernet0/0 no ip address shutdown ...You can also skip forward to a certain line once you've already begun viewing the configuration by hitting
/ at the --More-- prompt, followed by the string you want to match:Router# sh run Building configuration... Current configuration : 601 bytes ! version 12.4 ... ! ! /interface filtering... interface FastEthernet0/0 no ip address shutdown ...
Do the do
Exec commands can be issued from within configuration mode via the do command. This can be handy for double-checking the current configuration before applying any changes.Switch(config-if)# do show run int f0 Building configuration... Current configuration : 31 bytes ! interface FastEthernet0 description Internal LAN ip address 172.16.0.1 255.255.0.0 end
Insert question marks
You can insert question marks into literal strings (such as interface descriptions) by typing CTRL+V immediately before the question mark. This acts as an escape character and prevents the command line from summoning the help menu.Switch(config-if)# description Where does this go[ctrl+v]?The interface description will appear as "Where does this go?"
Disable domain lookup on typos
Don't you hate it when this happens?Switch# shrun Translating "shrun"...domain server (255.255.255.255) % Unknown command or computer name, or unable to find computer addressYou can disable automatic DNS lookups with no ip domain-lookup, which will remove the delay before returning a new console prompt. However, this will also prevent you from referencing remote hosts by name, for example when telneting.
Switch(config)# no ip domain-lookup ... Switch#shrun Translating "shrun" % Unknown command or computer name, or unable to find computer addressAnother option is to leave DNS enabled, but configure your console ports and vtys to have no preferred transport for logging in to remote devices.
Router(config)#line con 0
Router(config-line)# transport preferred none
...
Router# asdfxyz
^
% Invalid input detected at '^' marker.
Router#You can no longer telnet by typing an IP address on the console, instead use the "telnet" or "ssh" commands for connecting to the desired hostname or ip address.Synchronous logging
When logging to the console is enabled, a Cisco device will often dump messages directly to the screen. This can become irritating when it interrupts you in the midst of typing a command. (FYI, you can continue typing normally and the command will still take, but this still throws some people off.)Synchronous logging can be enabled to "clean up" the CLI when this happens, outputting a fresh prompt below the message, along with any partially completed command.
Switch(config)# line con 0 Switch(config-line)# logging synchronous Switch(config-line)# line vty 0 15 Switch(config-line)# logging synchronous
Revert a configuration to its default
The default command, called from global configuration, can be used to revert any part of a configuration to its default value (which is often nothing). For example, it can be used to remove all configuration from a particular interface:Switch(config)# default g1/0/5 Interface GigabitEthernet1/0/5 set to default configuration Switch(config)# ^Z Switch# show run int g1/0/5 Building configuration... Current configuration : 38 bytes ! interface GigabitEthernet1/0/5 end
Show only applied access lists
For reasons unknown to me, IOS doesn't include a command to view what interfaces have ACLs applied. The closest we can get is drudging through the entire output of show ip interface. But, with a little ingenuity and the help of regular expressions, we can summon an efficient view of where our ACLs are applied.Switch# sh ip int | inc line protocol|access list is [^ ]+$ FastEthernet0 is up, line protocol is down FastEthernet1 is up, line protocol is up Inbound access list is prohibit-web FastEthernet2 is up, line protocol is up Inbound access list is 42 FastEthernet3 is up, line protocol is down FastEthernet4 is up, line protocol is upFor those curious, the regex above matches a line which either a) contains the string "line protocol", or b) contains the string "access list is " followed by a single word. This matches an ACL number or name (which can't contain spaces) but not "not set".
Speed up running-config display
When theshow running-config command is issued, the output has to be assembled from numerous values in memory into the human-friendly display you see on the CLI. Unfortunately, the longer your configuration is, the more time this takes. IOS 12.3T introduced a feature to cache the running configuration text for quicker output:Router(config)# parser config cache interface
Changing the break character to Ctrl+C
Router(config)# line vty 0 15 Router(config-line)# escape-character 3 Router(config)# line con 0 Router(config-line)# escape-character 3
Show running configuration with all defaults
Append thefull command to show running-config to include all the default statements which are normally hidden for brevity.Reload command
One of the classic mistakes is to incorrectly update an access-list on an interface when you are connected to the device remotely. And suddenly, the Telnet connection is dropped to the router because of a forgotten list entry that would permit your incoming connection.When you are doing something tricky, you can use the following feature of the reload command, which causes the router to reboot in a certain number of minutes. For example, let's tell the router to reboot in three minutes.
MyRouter# reload in 3
Reload scheduled in 3 minutes
Proceed with reload? [confirm]Now, we have three minutes to do what we need to do. Let's say we are applying an access-list to serial0.MyRouter# config terminal Enter configuration commands, one per line. End with CNTL/Z. MyRouter(config)# interface serial0 MyRouter(config-if)# ip access-group 110 in MyRouter(config-if)# ^ZWe made the change and everything still works. (Well, at least our connection wasn't dropped.) Now all we have to do cancel the impending reload with the following command:
MyRouter# reload cancelIf the reload is not cancelled, all the changes made will be discarded since they only exist in the running configuration.
IOS Console Customization
This article offers a few tips to customize the behavior of a Cisco IOS router's VTY and console lines.
Alternatively, a temporary custom escape character can be defined for the current session only using the
Set a Custom Escape Character
The default IOS escape sequence is ctrl-^x, or "control-shift-6, x", as we can see from the output ofshow terminal:Router# show terminal
Line 6, Location: "", Type: "xterm"
Length: 25 lines, Width: 120 columns
Baud rate (TX/RX) is 9600/9600
Status: PSI Enabled, Ready, Active, No Exit Banner, Automore On
Notify Process
Capabilities: none
Modem state: Ready
Special Chars: Escape Hold Stop Start Disconnect Activation
^^x none - - none
Timeouts: Idle EXEC Idle Session Modem Answer Session Dispatch
never never none not set
...This obscure sequence probably has some historical significance, but it is most commonly used on IOS today to interrupt a ping or traceroute command. We can set a custom escape character to something more convenient, such as ctrl-c (which is the ASCII character 3):Router(config)# line vty 0 15 Router(config-line)# escape-character ? BREAK Cause escape on BREAK CHAR or Escape character or its ASCII decimal equivalent DEFAULT Use default escape character NONE Disable escape entirely soft Set the soft escape character for this line Router(config-line)# escape-character 3We can now simply use ctrl-c in place of ctrl-shift-6. The "x" generally isn't necessary.
Alternatively, a temporary custom escape character can be defined for the current session only using the
terminal escape-character EXEC command.Increase the History Size
By default, the terminal history (which records recently used commands and is invoked with the up arrow) is limited to the last 20 commands. We can increase the history size under line configuration or via theterminal command:Router(config)# line vty 0 15
Router(config-line)# history size ?
Size of history buffer
Router(config-line)# history size 100show history can be used to inspect the contents of the history buffer.Infinite Terminal Length
Often you'll need to copy a good amount of text from the console (e.g. the output ofshow run or show tech-support). Depending on the terminal emulator in use, you may notice the copied or saved text has been polluted with lines reading "--More--" followed by unprintable characters (^H), which were inserted by the IOS CLI pager. A handy solution for this is to temporarily set the terminal length to zero, which effectively sets an infinite terminal length and disables terminal paging.Router# terminal length ?
Number of lines on screen (0 for no pausing)
Router# terminal length 0To return the terminal length, use terminal length appended with the desired number of lines (typically 24). If you want to permanently alter the terminal length, use the length command under line configuration.Include Timestamps on Show Commands
IOS includes an option to automatically timestamp the output ofshow commands. This can be handy when producing records for documentation or archival purposes.Router(config)# line vty 0 15 Router(config-line)# exec prompt timestamp Router(config-line)# ^Z Router# show ip interface brief Load for five secs: 0%/0%; one minute: 0%; five minutes: 1% Time source is hardware calendar, *03:14:21.123 EDT Wed Apr 14 2010 Interface IP-Address OK? Method Status Protocol FastEthernet0 70.174.182.38 YES DHCP up up FastEthernet1 unassigned YES NVRAM up down ...
Lock the Terminal
A little-known feature that might come in handy: IOS allows you to temporarily lock your console session. First, locking must be enabled under line configuration:Router#(config)# line console 0 Router#(config-line)# lockableSimply issue the
lock command, and provide and confirm a password of your choosing (it need not be your username's password) to lock the terminal. Provide the password again to unlock the terminal.Router# lock Password: Again: Locked Password: Router#
Use 'configure replace' Instead of 'copy start run'
Newbie Cisco networking admins are typically taught the command
As an example, consider the following configuration excerpt from a startup configuration:
A better alternative is to use the command
Note:-
copy running-config startup-config, or copy run start, to save their configurations to NVRAM (i.e. Flash memory). (This is in contrast to the older yet much much more convenient write memory command, or simply wr.) Students quickly realize that the corollary of copying the running configuration to the startup configuration is that the startup configuration can likewise be copied to the running configuration. However, this operation doesn't work quite like one might expect. copy run start generates a new configuration file and overwrites entirely the previous configuration file. copy start run, however, acts more like a copy & paste operation: the contents of the startup configuration are processed as though they were issued via the CLI. This means that running configuration lines that aren't in the startup configuration won't be overwritten or removed. The result is usually a messy, incomplete configuration.As an example, consider the following configuration excerpt from a startup configuration:
interface FastEthernet0/0 description WAN Uplink ip address 172.16.0.2 255.255.255.252 load-interval 60 duplex auto speed auto service-policy input Foo ! interface FastEthernet0/1 no ip address shutdown duplex auto speed autoAfter a few changes are made to accommodate a new uplink, the running configuration now looks like this:
interface FastEthernet0/0 no ip address shutdown duplex auto speed auto ! interface FastEthernet0/1 description New WAN Uplink ip address 10.0.42.2 255.255.255.252 load-interval 60 duplex auto speed auto service-policy input Foo2Before writing the new configuration to the startup configuration, the admin decides that the new uplink isn't ready yet and opts to revert the changes using
copy start run, which he assumes will restore the running configuration to the startup configuration. Here is the result:interface FastEthernet0/0 description WAN Uplink ip address 172.16.0.2 255.255.255.252 load-interval 60 shutdown duplex auto speed auto service-policy input Foo ! interface FastEthernet0/1 description New WAN Uplink no ip address load-interval 60 shutdown duplex auto speed auto service-policy input Foo2We can see that a number of statements under interface FastEthernet0/1 remain from the prior running configuration. Additionally, the
shutdown line was not removed from the FastEthernet0/0 interface as the startup configuration does not contain the no shutdown command.A better alternative is to use the command
configure replace, which is provided as part of IOS' configuration archival feature. This operation may take a moment depending on the size of your configuration file.Router# configure replace nvram:startup-config This will apply all necessary additions and deletions to replace the current running configuration with the contents of the specified configuration file, which is assumed to be a complete configuration, not a partial configuration. Enter Y if you are sure you want to proceed. ? [no]: y *Mar 1 00:22:03.095: Rollback:Acquired Configuration lock. *Mar 1 00:22:06.619: %PARSER-6-EXPOSEDLOCKRELEASED: Exclusive configuration lock released from terminal '0' -Process= "Exec", ipl= 0, pid= 193 *Mar 1 00:22:08.627: %LINK-3-UPDOWN: Interface FastEthernet0/0, changed state to up *Mar 1 00:22:09.655: %LINEPROTO-5-UPDOWN: Line protocol on Interface FastEthernet0/0, changed state to up The rollback configlet from the last pass is listed below: ******** !List of Commands: line vty 0 4 no login end ******** Rollback aborted after 5 passes Router# *Mar 1 00:22:14.995: %PARSER-3-CONFIGNOTLOCKED: Unlock requested by process '193'. Configuration not locked. Router#We can verify that our running configuration is now identical to our startup configuration:
interface FastEthernet0/0 description WAN Uplink ip address 172.16.0.2 255.255.255.252 load-interval 60 duplex auto speed auto service-policy input Foo ! interface FastEthernet0/1 no ip address shutdown duplex auto speed autoAs you might have guessed,
configure replace can be used to load a configuration file from any supported filesystem, not just NVRAM/Flash.Note:-
IP SLA monitoring an HTTP proxy
Cisco IOS includes a mechanism to monitor link attributes and ensure they stay within the parameters of a Service Level Agreement (SLA). An SLA is a contract between a service provider and its customer which outlines minimum benchmarks the service provider must maintain. In the data networking world, such benchmarks can include minimum throughput, delay, jitter, or other attributes. An IOS router can be configured with an IP SLA monitor to constantly evaluate these properties of a link or path and ensure that a service provider is fulfilling its obligation.
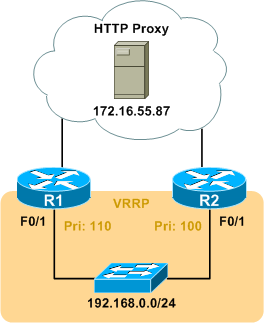
However, SLA monitors can also be useful within an enterprise. Consider the following topology:
The 192.168.0.0/24 subnet is connected to the rest of the network by R1 and R2, and web access to the Internet is accomplished through a proxy (172.16.55.87) located elsewhere on the network. R1 and R2 do not share a common path to the proxy, and one might lose connectivity to the proxy while the other does not. The VRRP deployment facing 192.168.0.0/24 complicates this, as web access will be lost if the master router can no longer forward HTTP requests to the proxy. R1 has been configured with a VRRP priority of 110, while R2 has the default priority of 100.
Fortunately, we can configure an IP SLA monitor on R1 to check for HTTP connectivity to the web proxy. The monitor can then be referenced by the VRRP configuration to lower the router's VRRP priority when the monitor fails. First we have to configure an HTTP IP SLA monitor:
However, SLA monitors can also be useful within an enterprise. Consider the following topology:
The 192.168.0.0/24 subnet is connected to the rest of the network by R1 and R2, and web access to the Internet is accomplished through a proxy (172.16.55.87) located elsewhere on the network. R1 and R2 do not share a common path to the proxy, and one might lose connectivity to the proxy while the other does not. The VRRP deployment facing 192.168.0.0/24 complicates this, as web access will be lost if the master router can no longer forward HTTP requests to the proxy. R1 has been configured with a VRRP priority of 110, while R2 has the default priority of 100.
Fortunately, we can configure an IP SLA monitor on R1 to check for HTTP connectivity to the web proxy. The monitor can then be referenced by the VRRP configuration to lower the router's VRRP priority when the monitor fails. First we have to configure an HTTP IP SLA monitor:
R1(config)# ip sla 1 R1(config-ip-sla)# http get http://172.16.55.87/ R1(config-ip-sla-http)# frequency 60 R1(config-ip-sla-http)# timeout 5000The above configuration creates a monitor which sends an HTTP GET request to the specified URL every 60 seconds and checks for a valid response. The timeout has been set for 5000 milliseconds, or 5 seconds. Note that this configuration only checks for HTTP connectivity to the proxy itself; however, if we wanted to be especially thorough, IOS also provides an option to check for HTTP connectivity to external sites through the proxy:
R1(config-ip-sla)# http get http://external-site/ proxy http://172.16.55.87/ name-server 172.16.44.10Next, we schedule the monitor to run. In this case, we want the monitor to run continuously beginning right now.
R1(config)# ip sla schedule 1 start-time now life foreverThe monitor will now start. After a few minutes, we can view the IP SLA statistics to verify it is successful:
R1# show ip sla statistics
Round Trip Time (RTT) for Index 1
Latest RTT: 72 milliseconds
Latest operation start time: *00:42:17.839 UTC Fri Mar 1 2002
Latest operation return code: OK
Latest DNS RTT: 0 ms
Latest TCP Connection RTT: 20 ms
Latest HTTP Transaction RTT: 52 ms
Number of successes: 3
Number of failures: 0
Operation time to live: ForeverNow that our SLA monitor is up and running, we need to create a tracked object pointing to it. Depending on the IOS version in use, an IP SLA monitor is referenced as a Response Time Reporter (RTR) with rtr (prior to 12.4(20)T), or with ip sla (12.4(20)T and later). The legacy RTR syntax is used here:R1(config)# track 1 rtr 1 state R1(config-track)# exitThe tracked object serves as a wrapper for the IP SLA monitor so that it can be referenced from VRRP, which is the last portion to configure:
R1(config)# interface f0/1 R1(config-if)# vrrp 1 track 1 decrement 20 R1(config-if)# ^Z R1# show vrrp FastEthernet0/1 - Group 1 State is Master Virtual IP address is 192.168.0.1 Virtual MAC address is 0000.5e00.0101 Advertisement interval is 1.000 sec Preemption enabled Priority is 110 Track object 1 state Up decrement 20 Master Router is 192.168.0.2 (local), priority is 110 Master Advertisement interval is 1.000 sec Master Down interval is 3.570 secNow, if the SLA monitor fails to receive an HTTP response from the proxy, the tracked object changes state to "down," and the the VRRP process on 192.168.0.2 will decrement its priority by 20. With R2 configured with the default priority of 100, it should take over as the master VRRP router. We can disconnect R1 from the proxy to observe an IP SLA monitor failure and subsequent VRRP failover:
R1# show ip sla statistics
Round Trip Time (RTT) for Index 1
Latest RTT: 0 milliseconds
Latest operation start time: *01:00:17.839 UTC Fri Mar 1 2002
Latest operation return code: Socket receive error
Latest DNS RTT: 0 ms
Latest TCP Connection RTT: 0 ms
Latest HTTP Transaction RTT: 0 ms
Number of successes: 20
Number of failures: 1
Operation time to live: Forever
R1#
*Mar 1 01:00:25.179: %VRRP-6-STATECHANGE: Fa0/1 Grp 1 state Master -> BackupR2# show vrrp FastEthernet0/1 - Group 1 State is Master Virtual IP address is 192.168.0.1 Virtual MAC address is 0000.5e00.0101 Advertisement interval is 1.000 sec Preemption enabled Priority is 100 Master Router is 192.168.0.3 (local), priority is 100 Master Advertisement interval is 1.000 sec Master Down interval is 3.609 secOf course, if the connection to the proxy is restored, and the IP SLA monitor recovers, R1 restores its VRRP priority to 110, and takes over to once again become the master router.
IOS Resilient Configuration
Cisco IOS Resilient feature enables critical router files, namely the IOS image and configuration, to persist despite destructive events such as deletion of the startup configuration or a format of the Flash filesystem. The feature does not require any external services; all persistent files are stored locally on the router.
Be aware that the resilient configuration file is not automatically updated along with the startup configuration. To update it, you must first delete the existing resilient configuration and issue the
Enabling Resilient Configuration
First, a quick review of how Cisco ISR (x800 series) routers work. The binary IOS image used to boot the router is stored on the Flash filesystem, which is a type of memory very similar to that found inside a USB thumbdrive. The startup configuration file is stored on a separate filesystem, NVRAM. The contents of both filesystems can be viewed with thedir command.Router# dir flash:
Directory of flash:/
1 -rw- 23587052 Jan 9 2010 17:16:58 +00:00 c181x-advipservicesk9-mz.124-24.T.bin
2 -rw- 600 Sep 26 2010 07:28:12 +00:00 vlan.dat
128237568 bytes total (104644608 bytes free)
Router# dir nvram:
Directory of nvram:/
189 -rw- 1396 startup-config
190 ---- 24 private-config
191 -rw- 1396 underlying-config
1 -rw- 0 ifIndex-table
2 -rw- 593 IOS-Self-Sig#3401.cer
3 ---- 32 persistent-data
4 -rw- 2945 cwmp_inventory
21 -rw- 581 IOS-Self-Sig#1.cer
196600 bytes total (130616 bytes free)The resilient image and configuration features are enabled with one command each.Router(config)# secure boot-image Router(config)# %IOS_RESILIENCE-5-IMAGE_RESIL_ACTIVE: Successfully secured running image Router(config)# secure boot-config Router(config)# %IOS_RESILIENCE-5-CONFIG_RESIL_ACTIVE: Successfully secured config archive [flash:.runcfg-20101017-020040.ar]The combination of the secured IOS image and configuration file is referred to as the bootset. We can verify the secure configuration with the command
show secure bootset.Router# show secure bootset IOS resilience router id FHK110913UQ IOS image resilience version 12.4 activated at 02:00:30 UTC Sun Oct 17 2010 Secure archive flash:c181x-advipservicesk9-mz.124-24.T.bin type is image (elf) [] file size is 23587052 bytes, run size is 23752654 bytes Runnable image, entry point 0x80012000, run from ram IOS configuration resilience version 12.4 activated at 02:00:41 UTC Sun Oct 17 2010 Secure archive flash:.runcfg-20101017-020040.ar type is config configuration archive size 1544 bytesAt this point, we notice that our IOS image file on Flash is now hidden.
Router# dir flash: Directory of flash:/ 2 -rw- 600 Sep 26 2010 07:28:12 +00:00 vlan.dat 128237568 bytes total (104636416 bytes free)
Restoring an Archived Configuration
Now suppose that the router's startup configuration file is erased (accidentally or otherwise) and the router is reloaded. Naturally, it boots with a default configuration. The resilient configuration feature will even appear to be disabled.Router# erase startup-config Erasing the nvram filesystem will remove all configuration files! Continue? [confirm] [OK] Erase of nvram: complete Router# show startup-config startup-config is not present Router# reload System configuration has been modified. Save? [yes/no]: n Proceed with reload? [confirm] ... Router> enable Router# show secure bootset %IOS image and configuration resilience is not activeTo restore our original configuration, we simply have to extract it from the secure archive and save it to Flash. Next, we can replace the current running configuration with the archived config using the
configure replace command.Router(config)# secure boot-config restore flash:archived-config ios resilience:configuration successfully restored as flash:archived-config Router(config)# ^C Router# configure replace flash:archived-config This will apply all necessary additions and deletions to replace the current running configuration with the contents of the specified configuration file, which is assumed to be a complete configuration, not a partial configuration. Enter Y if you are sure you want to proceed. ? [no]: y Total number of passes: 1 Rollback Done Router#Don't forget to save the running configuration once the restoration is complete (
copy run start).Be aware that the resilient configuration file is not automatically updated along with the startup configuration. To update it, you must first delete the existing resilient configuration and issue the
secure boot-config command again.Router(config)# no secure boot-config %IOS_RESILIENCE-5-CONFIG_RESIL_INACTIVE: Disabled secure config archival [removed flash:.runcfg-20101017-020040.ar] Router(config)# secure boot-config %IOS_RESILIENCE-5-CONFIG_RESIL_ACTIVE: Successfully secured config archive [flash:.runcfg-20101017-024745.ar]Finally, note that the secure bootset features can only be disabled from the console line.
Router(config)# no secure boot-config %You must be logged on the console to apply this commandIn fact, attempting to disable either part of the secure bootset generates a handy syslog message to alert administrators:
%IOS_RESILIENCE-5-NON_CONSOLE_ACCESS: Non console configuration request denied for command "no secure boot-config "
What About the IOS Image?
It turns out that the secure boot image feature works pretty well too. Here we can see that it persists even when the Flash filesystem appears to have been formatted.Router# format flash:
Format operation may take a while. Continue? [confirm]
Format operation will destroy all data in "flash:". Continue? [confirm]
Writing Monlib sectors...
Monlib write complete
Format: All system sectors written. OK...
Format: Total sectors in formatted partition: 250848
Format: Total bytes in formatted partition: 128434176
Format: Operation completed successfully.
Format of flash: complete
Router# dir
Directory of flash:/
No files in directory
128237568 bytes total (104640512 bytes free)
Router# reload
Proceed with reload? [confirm]
*Oct 17 02:37:37.127: %SYS-5-RELOAD: Reload requested by console. Reload Reason
: Reload Command.
System Bootstrap, Version 12.3(8r)YH8, RELEASE SOFTWARE (fc2)
Technical Support: http://www.cisco.com/techsupport
Copyright (c) 2006 by cisco Systems, Inc.
C1800 platform with 131072 Kbytes of main memory with parity disabled
Upgrade ROMMON initialized
program load complete, entry point: 0x80012000, size: 0xc0c0
Initializing ATA monitor library.......
program load complete, entry point: 0x80012000, size: 0xc0c0
Initializing ATA monitor library.......
program load complete, entry point: 0x80012000, size: 0x167e724
Self decompressing the image : #################################################
################################################################################
################################################################ [OK]
Restricted Rights Legend
Use, duplication, or disclosure by the Government is
subject to restrictions as set forth in subparagraph
(c) of the Commercial Computer Software - Restricted
Rights clause at FAR sec. 52.227-19 and subparagraph
(c) (1) (ii) of the Rights in Technical Data and Computer
Software clause at DFARS sec. 252.227-7013.
cisco Systems, Inc.
170 West Tasman Drive
San Jose, California 95134-1706
Cisco IOS Software, C181X Software (C181X-ADVIPSERVICESK9-M), Version 12.4(24)T,
RELEASE SOFTWARE (fc1)
Technical Support: http://www.cisco.com/techsupport
Copyright (c) 1986-2009 by Cisco Systems, Inc.
Compiled Thu 26-Feb-09 03:22 by prod_rel_team
...
Router> enable
Password:
Router# dir
Directory of flash:/
No files in directory
128237568 bytes total (104640512 bytes free)
Router# show version
Cisco IOS Software, C181X Software (C181X-ADVIPSERVICESK9-M), Version 12.4(24)T,
RELEASE SOFTWARE (fc1)
Technical Support: http://www.cisco.com/techsupport
Copyright (c) 1986-2009 by Cisco Systems, Inc.
Compiled Thu 26-Feb-09 03:22 by prod_rel_team
...Cisco Switch Port Security
Port security is a layer two traffic control feature on Cisco Catalyst switches. It enables an administrator configure individual switch ports to allow only a specified number of source MAC addresses ingressing the port. Its primary use is to deter the addition by users of "dumb" switches to illegally extend the reach of the network (e.g. so that two or three users can share a single access port). The addition of unmanaged devices complicates troubleshooting by administrators and is best avoided.
We can view the default port security configuration with
shutdown (default) ; The interface is placed into the error-disabled state, blocking all traffic. protect ; Frames from MAC addresses other than the allowed addresses are dropped; traffic from allowed addresses is permitted to pass normally. restrict ; Like
By changing the violation mode to
Enabling Port Security
Port security can be enabled with default parameters by issuing a single command on an interface:Switch(config)# interface f0/13 Switch(config-if)# switchport port-securityAlthough only a single interface is used for illustration in this article, port security, if configured, is typically configured on all user-facing interfaces.
We can view the default port security configuration with
show port-security:Switch# show port-security interface f0/13 Port Security : Enabled Port Status : Secure-down Violation Mode : Shutdown Aging Time : 0 mins Aging Type : Absolute SecureStatic Address Aging : Disabled Maximum MAC Addresses : 1 Total MAC Addresses : 0 Configured MAC Addresses : 0 Sticky MAC Addresses : 0 Last Source Address:Vlan : 0000.0000.0000:0 Security Violation Count : 0As you can see, there are a number of attributes which can be adjusted. We'll cover these in a moment. When a host connects to the switch port, the port learns the host's MAC address as the first frame is received:
Switch# show port-security interface f0/13 Port Security : Enabled Port Status : Secure-up Violation Mode : Shutdown Aging Time : 0 mins Aging Type : Absolute SecureStatic Address Aging : Disabled Maximum MAC Addresses : 1 Total MAC Addresses : 1 Configured MAC Addresses : 0 Sticky MAC Addresses : 0 Last Source Address:Vlan : 001b.d41b.a4d8:10 Security Violation Count : 0Now, we disconnect the host from the port, connect a small switch or hub, and reconnect the original host plus a second, unauthorized host so that they both attempt to share the access port. Observe what happens as soon as the second host attempts to send traffic:
%PM-4-ERR_DISABLE: psecure-violation error detected on Fa0/13, putting Fa0/13 in err-disable state %PORT_SECURITY-2-PSECURE_VIOLATION: Security violation occurred, caused by MAC address 0021.55c8.f13c on port FastEthernet0/13. %LINEPROTO-5-UPDOWN: Line protocol on Interface FastEthernet0/13, changed state to down %LINK-3-UPDOWN: Interface FastEthernet0/13, changed state to downInspecting the status of port security on the port again, we can see that the new MAC address triggered a violation:
Switch# show port-security interface f0/13
Port Security : Enabled
Port Status : Secure-shutdown
Violation Mode : Shutdown
Aging Time : 0 mins
Aging Type : Absolute
SecureStatic Address Aging : Disabled
Maximum MAC Addresses : 1
Total MAC Addresses : 0
Configured MAC Addresses : 0
Sticky MAC Addresses : 0
Last Source Address:Vlan : 0021.55c8.f13c:10
Security Violation Count : 1
Switch# show interfaces f0/13
FastEthernet0/13 is down, line protocol is down (err-disabled)
Hardware is Fast Ethernet, address is 0013.c412.0f0d (bia 0013.c412.0f0d)
MTU 1500 bytes, BW 100000 Kbit, DLY 100 usec,
reliability 255/255, txload 1/255, rxload 1/255
Encapsulation ARPA, loopback not set
...By default, a port security violation forces the interface into the error-disabled state. An administrator must re-enable the port manually by issuing the shutdown interface command followed by no shutdown. This must be done after the offending host has been removed, or the violation will be triggered again as soon as the second host sends another frame.Tweaking Port Security
Violation Mode
Port security can be configured to take one of three actions upon detecting a violation:shutdown (default) ; The interface is placed into the error-disabled state, blocking all traffic. protect ; Frames from MAC addresses other than the allowed addresses are dropped; traffic from allowed addresses is permitted to pass normally. restrict ; Like
protect mode, but generates a syslog message and increases the violation counter.By changing the violation mode to
restrict, we are still alerted when a violation occurs, but legitimate traffic remains unaffected:Switch(config-if)# switchport port-security violation restrict Switch(config-if)# ^Z Switch# %PORT_SECURITY-2-PSECURE_VIOLATION: Security violation occurred, caused by MAC address 0021.55c8.f13c on port FastEthernet0/13. Switch# show port-security interface f0/13 Port Security : Enabled Port Status : Secure-up Violation Mode : Restrict Aging Time : 0 mins Aging Type : Absolute SecureStatic Address Aging : Disabled Maximum MAC Addresses : 1 Total MAC Addresses : 1 Configured MAC Addresses : 0 Sticky MAC Addresses : 0 Last Source Address:Vlan : 0021.55c8.f13c:10 Security Violation Count : 3Unfortunately, violating traffic will continue to trigger log notifications, and the violation counter will continue to increase, until the violating host is dealt with.
Maximum MAC Addresses
By default, port security limits the ingress MAC address count to one. This can be modified, for example, to accommodate both a host and an IP phone connected in series on a switch port:Switch(config-if)# switchport port-security maximum 2One also has the option to set a maximum MAC count for the access and voice VLANs independently (assuming a voice VLAN has been configured on the interface):
Switch(config-if)# switchport port-security maximum 1 vlan access Switch(config-if)# switchport port-security maximum 1 vlan voice
MAC Address Learning
An administrator has the option of statically configuring allowed MAC addresses per interface. MAC addresses can optionally be configured per VLAN (access or voice).Switch(config-if)# switchport port-security mac-address 001b.d41b.a4d8 ? vlan set VLAN ID of the VLAN on which this address can be learnedThe configured MAC address(es) are recorded in the running configuration:Switch(config-if)# switchport port-security mac-address 001b.d41b.a4d8 vlan access
Switch# show running-config interface f0/13 Building configuration... Current configuration : 259 bytes ! interface FastEthernet0/13 switchport access vlan 10 switchport mode access switchport voice vlan 20 switchport port-security switchport port-security violation restrict switchport port-security mac-address 001b.d41b.a4d8 spanning-tree portfast endObviously, this is not a scalable practice. A much more convenient alternative is to enable "sticky" MAC address learning; MAC addresses will be dynamically learned until the maximum limit for the interface is reached.
Switch(config-if)# no switchport port-security mac-address 001b.d41b.a4d8 Switch(config-if)# switchport port-security mac-address sticky Switch(config-if)# ^Z Switch# show port-security interface f0/13 Port Security : Enabled Port Status : Secure-up Violation Mode : Restrict Aging Time : 0 mins Aging Type : Absolute SecureStatic Address Aging : Disabled Maximum MAC Addresses : 1 Total MAC Addresses : 1 Configured MAC Addresses : 0 Sticky MAC Addresses : 1 Last Source Address:Vlan : 001b.d41b.a4d8:10 Security Violation Count : 0After a MAC address has been learned, it is recorded to the configuration similarly to as if it were entered manually:
Switch# show running-config interface f0/13 Building configuration... Current configuration : 311 bytes ! interface FastEthernet0/13 switchport access vlan 10 switchport mode access switchport voice vlan 20 switchport port-security switchport port-security violation restrict switchport port-security mac-address sticky switchport port-security mac-address sticky 001b.d41b.a4d8 spanning-tree portfast end
MAC Address Aging
By default, secure MAC addresses are learned (in effect) permanently. Aging can be configured so that the addresses expire after a certain amount of time has passed. This allows a new host to take the place of one which has been removed. Aging can be configured to take effect at regular intervals, or only during periods of inactivity. The following example configures expiration of MAC addresses after five minutes of inactivity:Switch(config-if)# switchport port-security aging time 5 Switch(config-if)# switchport port-security aging type inactivity Switch(config-if)# ^Z Switch# show port-security interface f0/13 Port Security : Enabled Port Status : Secure-up Violation Mode : Restrict Aging Time : 5 mins Aging Type : Inactivity SecureStatic Address Aging : Disabled Maximum MAC Addresses : 1 Total MAC Addresses : 1 Configured MAC Addresses : 0 Sticky MAC Addresses : 0 Last Source Address:Vlan : 001b.d41b.a4d8:10 Security Violation Count : 0After five minutes of inactivity, we can see that the address has been purged:
Switch# show port-security interface f0/13 Port Security : Enabled Port Status : Secure-up Violation Mode : Restrict Aging Time : 5 mins Aging Type : Inactivity SecureStatic Address Aging : Disabled Maximum MAC Addresses : 1 Total MAC Addresses : 0 Configured MAC Addresses : 0 Sticky MAC Addresses : 0 Last Source Address:Vlan : 001b.d41b.a4d8:10 Security Violation Count : 0At this point, the old address will be re-learned the next time a frame is sent from that host, or a new host can take its place.
Auto-recovery
To avoid having to manually intervene every time a port-security violation forces an interface into the error-disabled state, one can enable auto-recovery for port security violations. A recovery interval is configured in seconds.Switch(config)# errdisable recovery cause psecure-violation Switch(config)# errdisable recovery interval 600Ten minutes after a port was error-disabled, we can see that the port is automatically transitioned back into operation:
%PM-4-ERR_RECOVER: Attempting to recover from psecure-violation err-disable state on Fa0/13 %LINK-3-UPDOWN: Interface FastEthernet0/13, changed state to up %LINEPROTO-5-UPDOWN: Line protocol on Interface FastEthernet0/13, changed state to upThis is a great way to automatically clear port security violations after the user has been given an opportunity to remove the offending host(s). Note that is the cause is not cleared, the violation will trigger again after the port comes back up, re-initating the auto-recovery cycle.
Note
Although a deterrent, port security is not a reliable security feature, as MAC addresses are trivially spoofed, and multiple hosts can still easily be hidden behind a small router. IEEE 802.1X is a much more robust access edge security solution.How to Change JKS KeyStore Private Key Password
Use following keytool command to change the key store password >keytool -storepasswd -new [new password ] -keystore [path to key stor...
-
AIX Environment Procedures The best way to approach this portion of the checklist is to do a comprehensive physical inventory of the server...
-
Address Resolution Protocol (ARP) provides IP-to-MAC (32-bit IP address into a 48-bit Ethernet address) resolution. ARP operates at Layer 2 ...
Another thing worth talking about is using this in conjunction with configuration archives.
http://www.cisco.com/en/US/docs/ios/12_3t/12_3t7/feature/guide/gtrollbk.html