The Pass-The-Hash Toolkit contains utilities to manipulate the Windows Logon Sessions maintained by the LSA (Local Security Authority) component. These tools allow you to list the current logon sessions with its corresponding NTLM credentials (e.g.: users remotely logged in thru Remote Desktop/Terminal Services), and also change in runtime the current username, domain name, and NTLM hashes (YES, PASS-THE-HASH on Windows!).
Pass-The-Hash Toolkit
Pass-The-Hash Toolkit is comprised of three tools: IAM.EXE, WHOSTHERE.EXE and GENHASH.EXE.
GENHASH.EXE This is just a utility that uses some undocumented Windows functions to generate the LM and NT hash of a password. This tool is useful to test IAM.EXE and WHOSTHERE.EXE and perhaps to do some other things. Pretty simple and small tool.
IAM.EXE This tools allows you to change your current NTLM credentials without having the cleartext password but the hashes of the password. The program receives a username, domain name and the LM and NT hashes of the password; using this it will change in memory the NTLM credentials associated with the current windows logon session. After the program performs this operation, all outbound network connections to services that use for authentication the NTLM credentials of the currently logged on user will utilize the credentials modified by IAM.EXE.
WHOSTHERE.EXE This tools will list logon sessions with NTLM credentials (username,domain name, LM and NT hashes). Logon sessions are created by windows services that log in using specific users, remote desktop connections, etc. This tool has many uses, one that i think is interesting: Let’s say you compromised a Windows Server that is part of a Windows Domain (e.g.: Backup server) but is NOT the domain controller.
You can download Pass-The-Hash Toolkit v1.3 here:
Source Code
Latest stable release (1.3), updated on February 29, 2008.
Win32 binaries
Latest stable release (1.3), updated on February 29, 2008.
4/27/08
4/23/08
Set a password to start Windows
Windows 2000 and later operating systems use the Windows Data Protection mechanism to protect private keys and stored credentials that applications and services want to keep confidential.
Each time you boot your computer, Windows uses the Startup Key to decrypt the private keys. The Startup Key is a unique key generated for each Windows installation that encrypts and decrypts local password hashes, private keys (e.g. EFS), information stored in active directory on domain controllers and the administrator password.
Windows lets you configure a system Startup password using the Syskey utility. This password must be entered during the boot time to decrypt the system key so that Windows can access the SAM database and other private keys. A Startup password can range from 1 to 128 characters.
To configure a Startup Password, open the command prompt, type syskey, and then press enter. In the dialog box, click the Update button. Click Password Startup to require a password to start Windows. Enter the desired password and press OK. Microsoft recommends the password length to be at least 12 characters long.
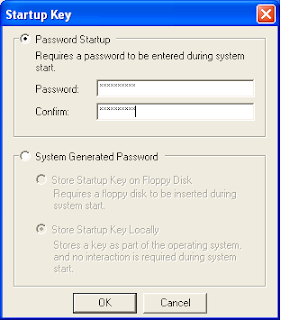
Now, the next time you boot your computer, you will see the following screen:
 A Startup Password definitely adds an extra layer of security to your confidential information. Yet, it is possible to crack the Startup Password with physical access to your computer.
Wipe data with Cipher security tool
When you delete data files, the information is not really removed from the hard disk. Instead, the space that was occupied by the deleted data is deallocated and is available for use when new data is written to the disk. Until the space is overwritten, it is possible to recover delete data with raw disk editors and various data recovery software.
The built-in Cipher command-line utility has a special option to clean deleted data on a hard disk. To overwrite delete data, use the Cipher utility with the /w switch. Use the following steps:
Click the Start button and type cmd and press ENTER.
Type cipher /w:DRIVER:\DIRECTORY and press enter. Specify the drive and the folder that contains the deleted data that you want to overwrite.
The Cipher utility permanently removes the data. The process can take a long time if you are overwriting a large space. The Cipher utility is available for Windows XP - Vista. Windows 2000 users must install the Windows 2000 Security Rollup Package 1.
EndPointScan: Online scanner for portable devices
GFI offers a free web utility - EndPointScan - to check within minutes what devices are or have been connected to computers in your network. All you need to do is to install an ActiveX control (0.7MB) on your computer. Once installed, GFI EndPointScan will then prompt you to select which computers on your network should be scanned for plugged-in devices.
Once a scan is completed, EndPointScan will display scan results in a graphical report. The report includes device usage, device threat level and computer risk level. The information presented refers to devices connected both currently and historically.
Works with Windows 2000, XP and 2003. Requires Microsoft Internet Explorer 6 or later.
VoIPong - VoIP calls sniffer
VoIPong is a free VoIP sniffer that detects all Voice-over-IP (VoIP) calls and gateways on a pipeline and produces audio files. It supports several types of VoIP protocols: SIP, H.323, Skinny Client Protocol, G711, RTP and RTCP.
A liveCD version, based on the FreeSBIE project, is also available. It has a pre-installed VoIPong release along with several boot-time scripts for configuring the OS and VoIPong.
VoIPong LiveCD
Download VoIPong
A liveCD version, based on the FreeSBIE project, is also available. It has a pre-installed VoIPong release along with several boot-time scripts for configuring the OS and VoIPong.
VoIPong LiveCD
Download VoIPong
PWDumpX: Windows encrypted password retrieveal
PWDumpX is a free open-source utility that provides system administrators the ability to retrieve the domain password cache, password hashes and LSA secrets from either local or remote Windows systems.
If you provide an input list of remote systems, PWDumpX will attempt to obtain the domain password cache, the password hashes and the LSA secrets from each remote Windows system in a multi-threaded fashion - up to 64 systems simultaneously. The retrieved information is encrypted as they are transfered over the network.
PWDumpX requires Windows NT - 2003. You can download PWDumpX here.
Orizon: Source code auditing platform
Auditing source code is rapidly becoming a standard practice employed by security teams to assure that software applications meet their security requirements. The goal of this procedure is to achieve a secure and reliable software and fix potential security holes before the software is deployed.
Orizon is a framework that provides a set of API to do automatic source code auditing. The Orizon framework utilizes both static and dynamic code analysis techniques to discover potential security holes in the source code. The static approach simply falls through the source code and searches for well-known insecure code patterns, while dynamic approach determines software behavior based on ad-hoc input data.
While still in early-stage development, Orizon can find insecure usage of routines (for example, strcpy), potential SQL-Injection and Cross-Site-Scripting vulnerabilities, and several other vulnerabilities from the OWASP Top 10 list.
The Open Web Application Security Project (OWASP) Top 10 lists the most serious web application vulnerabilities, and discusses how to protect against them. The primary aim of the project is to educate developers and software engineers about the consequences of the most common web application security vulnerabilities.
Orizon is still far from being a stable API platform for building source code auditing tools, but the developer believes the project will be the de facto platform for source code auditing tools in the short future.
KeepPassSD: Password manager for mobile devices
KeepPassSD is a Windows Mobile port of the popular open source password manager KeepPass. Just like the desktop software, KeepPassSD securely saves passwords to various login services on your Windows-based mobile device.
For first time users, here’s how it works. KeepPassSD stores all your user-names and passwords for various login services in a single master database which is protected by either a master password or key files that you carry with you on a floppy or a USB device. Opening the master database without the proper password is nearly impossible.
There are two development branches fro KeepPass for Windows Mobile: KeepPassPPC and KeepPassSD. KeepPassPPC works on all PocketPC 2003 SE and Windows Mobile 5.0 PocketPC and Phone Edition based platforms. KeepPassSD, the would-be successor of KeePassPPC, is under heavy development and should run on PocketPC 2003 SE, Windows Mobile 5.0 PocketPC, Phone Edition and SmartPhone, Windows Mobile 6.0 standard and Pro editions.
Make sure you backup all your data before installing any of these tools.
Download KeePassSD here.
Clear the page file to prevent data leaks
Virtual memory is a truly great mechanism. It protects programs from one another and lets them utilize more memory than actually available. In a nutshell, you can think of virtual memory as an alternate set of memory addresses.
As you run more and more programs, at some point, you’ll begin running out of physical memory. Since things can get slower when this happens, the virtual memory manager will copy as much data and possible into main memory and leave the rest on the disk (the page file). This process is known as swapping.
If you run a program that contains confidential information (passwords, encryption keys etc.), the memory chunk containing such information may be swapped out to disk. Windows deploys several types of protection mechanisms to assure no one is trying to read the page file, but what happens when you boot into a different operating system? Your confidential data is exposed to prying eyes.
To prevent potential information leaks, you can configure Windows to overwrite the page file each time it shuts down. To enable this option, open the Windows Registry editor (Run and type regedit) and navigate to:
HKEY_LOCAL_MACHINE\SYSTEM\CurrentControlSet\Control\Session Manager\Memory Management and change the value of ClearPageFileAtShutdown to 1.

Now, the next time you shut down your computer, the page file will be cleared. Note that it may take Windows longer to shut down.
Top 15 free SQL Injection Scanners
While the adoption of web applications for conducting online business has enabled companies to connect seamlessly with their customers, it has also exposed a number of security concerns stemming from improper coding. Vulnerabilities in web applications allow hackers to gain direct and public access to sensitive information (e.g. personal data, login credentials).
Web applications allow visitors to submit and retrieve data to/from a database over the Internet. Databases are the heart of most web applications. They hold data needed for web applications to deliver specific content to visitors and provide information to customers, suppliers etc.
SQL Injection is perhaps the most common web-application hacking technique which attempts to pass SQL commands through a web application for execution by the back-end database. The vulnerability is presented when user input is incorrectly sanitized and thereby executed.
Checking for SQL Injection vulnerabilities involves auditing your web applications and the best way to do it is by using automated SQL Injection Scanners. We’ve compiled a list of free SQL Injection Scanners we believe will be of a value to both web application developers and professional security auditors.
SQLIer - SQLIer takes a vulnerable URL and attempts to determine all the necessary information to exploit the SQL Injection vulnerability by itself, requiring no user interaction at all. Get SQLIer.
SQLbftools - SQLbftools is a collection of tools to retrieve MySQL information available using a blind SQL Injection attack. Get SQLbftools.
SQL Injection Brute-forcer - SQLibf is a tool for automatizing the work of detecting and exploiting SQL Injection vulnerabilities. SQLibf can work in Visible and Blind SQL Injection. It works by doing simple logic SQL operations to determine the exposure level of the vulnerable application. Get SQLLibf.
SQLBrute - SQLBrute is a tool for brute forcing data out of databases using blind SQL injection vulnerabilities. It supports time based and error based exploit types on Microsoft SQL Server, and error based exploit on Oracle. It is written in Python, uses multi-threading, and doesn’t require non-standard libraries. Get SQLBrute.
BobCat - BobCat is a tool to aid an auditor in taking full advantage of SQL injection vulnerabilities. It is based on AppSecInc research. It can list the linked severs, database schema, and allow the retrieval of data from any table that the current application user has access to. Get BobCat.
SQLMap - SQLMap is an automatic blind SQL injection tool, developed in python, capable to perform an active database management system fingerprint, enumerate entire remote databases and much more. The aim of SQLMap is to implement a fully functional database management system tool which takes advantages of web application programming security flaws which lead to SQL injection vulnerabilities. Get SQLMap.
Absinthe - Absinthe is a GUI-based tool that automates the process of downloading the schema and contents of a database that is vulnerable to Blind SQL Injection. Get Absinthe.
SQL Injection Pen-testing Tool - The SQL Injection Tool is a GUI-based utility designed to examine database through vulnerabilities in web-applications. Get SQL Injection Pen-testing tool.
SQID - SQL Injection digger (SQLID) is a command line program that looks for SQL injections and common errors in websites. It can perform the follwing operations: look for SQL injection in a web pages and test submit forms for possible SQL injection vulnerabilities. Get SQID.
Blind SQL Injection Perl Tool - bsqlbf is a Perl script that lets auditors retrieve information from web sites that are vulnerable to SQL Injection. Get Blind SQL Injection Perl Tool.
SQL Power Injection Injector - SQL Power Injection helps the penetration tester to inject SQL commands on a web page. It’s main strength is its capacity to automate tedious blind SQL injection with several threads. Get SQL Power Injection.
FJ-Injector Framwork - FG-Injector is a free open source framework designed to help find SQL injection vulnerabilities in web applications. It includes a proxy feature for intercepting and modifying HTTP requests, and an interface for automating SQL injection exploitation. Get FJ-Injector Framework.
SQLNinja - SQLNinja is a tool to exploit SQL Injection vulnerabilities on a web application that uses Microsoft SQL Server as its back-end database. Get SQLNinja.
Automagic SQL Injector - The Automagic SQL Injector is an automated SQL injection tool designed to help save time on penetration testing. It is only designed to work with vanilla Microsoft SQL injection holes where errors are returned. Get Automagic SQL Injector.
NGSS SQL Injector - NGSS SQL Injector exploit vulnerabilities in SQL injection on disparate database servers to gain access to stored data. It currently supports the following databases: Access, DB2, Informix, MSSQL, MySQL, Oracle, Sysbase. Get NGSS SQL Injector.
Protecting against SSH brute-force attacks
Practically all UNIX-based servers run a SSH server to allow remote administration across the Internet. From time to time, you might notice a large number of failed login attempts. Often, these are brute-force attacks against your SSH server
In this hack, we’ll show you 5 tips to protect machines running SSH daemons from brute-force attacks.
Change the default port
Configure your SSH daemon to listen on a non-standard port. SSH servers have no trouble doing this. Just make sure you configure your firewalls to allow connections to the new port. For instance, to have your SSH daemon to accept connections on port 2222, edit the sshd_config file and modify the value of Port to 2222 and restart the SSH daemon.
This method stops hackers who are just scanning for SSH servers on their default port, but any advance port scanner will reveal the daemon on a non-standard port. Nevertheless, this should reduce dramatically the number of attacks.
Disable Password Authentication
Passwords are easy to break than private-keys. Provide SSH key-based logins to all your users and disable password logins entirely. This will mean that users can only authenticate if they have the correct private key. To disable password authentication, edit sshd_config and change the value of PasswordAuthentication to no.
If you prefer passwords over SSH keys, make sure you use strong passwords for all your users.
Limit Connections
This method limits the number of SYN (connection establishment) packets. The effect of this should be unnoticed by legitimate users, but it will delay an attacker that is making repeated connections. For instance, if you want to limit the connection rate to port 2222 to three per minute:
iptables -A INPUT -p tcp –dport 2222 –syn -m limit –limit 1/m –limit-burst 3 -j ACCEPT
iptables -A INPUT -p tcp –dport 2222 –syn -j DROP
Disable Root Access
If you permit root login on your servers, you must disable it. It will still be possible to log in as a non-privileged user and become the super-user.
Deploy Anti-Brute-Force Tools
SSHDFilter -SSHDFilter blocks the frequent brute-force attacks by directly reading the SSH daemon logs and generating firewall rules to block the attack. The blocking firewall policy is defined by a list of block-rules. Download SSHDFilter.
pam_abl - A Pluggable Authentication Module that provides auto blacklisting of hosts and users responsible for repeated failed authentication attempts. Download pam_abl.
SSHBan - SSHban is simple daemon designed to ban attackers. Instead of scanning SSH logs, SSHBan directly receives data from the logger. Download SSHBan.
IPTables Recent Module - This Linux-kernel module allows you to track seen IP addresses and be able to match against them using some criteria. This module is extremely useful to build up a temporary list of IP addresses that attempt to brute-force your SSH server and drop everything coming from them for a given amount of time. Download IPTables Recent module.
DenyHost - DenyHosts is a script intended to be run by Linux system administrators to help thwart SSH server brute-force attacks . It observers login attempts to the SSH server and if it determines a possible brute-force attack, it will add the IP address to /etc/hosts.deny. Download DenyHost.
Brute-Force Detection -BFD is a shell script for parsing application logs and checking for authentication failures and block the IP address using custom firewall rules. Download Brute-Force Detection.
sshd_sentry - SSHD Sentry is a Perl script that monitors SSH server logs, detects repeated failed login attempts and adds the hosts to a black list. Download sshd_sentry.
SSHGuard - Protects networks from brute force attacks against ssh servers. It detects such attacks and blocks the host’s address with a firewall rule. Download SSHGuard.
CoreForce - free PC security package
Looking for a free and reliable security package for you PC? Try out CoreSecurity Core Force. Core Force is a comprehensive security solution for Windows. It provides security features to protect against malicious programs and external attacks that exploit and leverage security vulnerabilities in Windows and third-party software applications.
How does it work? Core Force enforces its own set of security configuration independently of Window’s configuration. You can configure security settings for the entire operating system or on a per application basis for specific programs such as email readers, Internet browsers, etc. They can include inbound and outbound network traffic restrictions, file system access restrictions to files and folders and registry access restrictions to registry keys and values.
Core Force includes a Windows port of OpenBSD’s Packet Filter firewall - an open source, server-level firewall. The port has been trimmed and tailored to make it suitable for personal systems. You can filter inbound and outbound connections and configure advance settings such as TCP options.
In addition, users can download predefined security profiles from the CORE FORCE community web site. These profiles are made by security experts around the world and rated by all users in the community. For instance, if you’re looking for a security profile to protect your popular web browser, you should check it out.
Core Force is a powerful firewall and system-monitoring suit designed for workstations and personal computers. It offers a great deal of flexibility in terms of which applications it can track and is quite simple to configure.
Access Webmail securely with SSH tunnels
Suppose you need to access your email from an insecure environment, such as an open wireless hotspot or an airport. When using a public (insecure) network, the potential security risk is that your valuable data can be sniffed by bad guys.
While majority of free e-mail providers, such as Google GMail and Yahoo! do provide options to login securely using https connections over secure socket layer, some email providers (business and free) don’t offer any encryption at all. To tackle this problem, we’re going to create a secure SSH tunnel over the insecure public network.
We’ve previously covered how SSH tunnels can help you to access private data over a public network. In this hack, we’re going to use a trusted SSH server to access our webmail. Remember that the connection from the server to the mail server isn’t encrypted. Nevertheless, this hack shows you how to bypass the insecure public network.
For Windows, we’re going to use Putty, a free SSH client for Windows that supports port forwarding. Fire up Putty on your computer and enter the host name or IP address of your trusted SSH server.
In the Tunnels options (left menu), in the “Source port” type 127.0.0.1:8888 (you can choose any port number you want) and in the “Destination” type your webmail address and the the remote port (e.g. email.security-hacks.com:80). Once you authenticate, you can access your web mail over the local address.
 The point of this hack is that when you access http://127.0.0.1:8888 it seemlessly creates a secure connection to your webmail server. By doing so, you assure no private data is transmitted in plain-text over the air.
Free PGP Webmail service - HushMail
If you don’t have the time or wish to download, install and configure PGP-based software application for email encryption, there’s an easier solution available for you. HushMail offers a free, web-based email service that has a built-in support for PGP email encryption.
All encryption and decryption is done on-the-fly and completely transparent to you. You can also upload your friend’s public-key to the HushMail server using HushTools, and likewise, your friend can download your public key so that both of you can send secure emails back and forth.
 Another cool feature that Hushmail offers is the ability to send encrypted emails to someone without them having to use any encryption software. If you both have a shared-secret (password), you can send someone an encrypted email that they can decrypt later using the shared-secret. [via Bauer-Power]
Find vulnerable Windows wireless drivers
As more and more businesses move from legacy wireless security models, attackers are looking for new techniques to exploit wireless networks. One technique that is rapidly gaining popularity is to exploit vulnerabilities in wireless network drivers.
Most users and security managers are not aware of the security threats posed by outdated wireless drivers. Vulnerabilities in wireless drivers are extremely dangerous since client firewalls and other protection mechanisms provide little to no protection on the compromised host.
WiFiDEnum, or WiFi Driver Enumerator, is a Windows tool that assesses wireless driver vulnerabilities on local and remote Windows workstations. It uses a database of discovered wireless-driver vulnerabilities to examine the versions of installed drivers and identifies specific drivers that are at risk to wireless security vulnerabilities.
In a nutshell, WiFiDEnum scans Windows hosts over the network (wired and wireless), extracts registry information to identify wireless drivers that are installed and the associated version information. For each wireless driver, it searches the local database to perform vulnerability assessment.

WiFiDEnum is easy to use. Just fire it up, enter a hostname, IP address or range of IP addresses you wish to scan. Once the scan is finished, you can generated a formatted HTML report that identifies all the vulnerable wireless drivers, along with links for more information about the vulnerability.
WiFiDEnum supports automatic updating of its wireless vulnerability database. As new Microsoft Windows wireless driver vulnerabilities are identified, they are added to the vulnerability database. You can check for new updates directly from the software menu
10 Anti-Phishing Firefox Extensions
For most Internet users, defending against phishing attacks is a top priority. Typically, phishing attacks involve phony emails and fraudulent web sites that try to lure users into disclosing user names, passwords and other personal information, such as credit card numbers and social security numbers.
The damage caused by phishing attacks ranges from loss of access to your web account to identity theft. Once the personal information is obtained, the phishers may use one’s details to steal money, create fake accounts etc.
One popular way to combat phishing attacks is to maintain a list of known phishing sites and to check web sites against the list. This hack highlights 10 anti-phishing Firefox extensions that can be used to mitigate the risk of being a victim of a phishing attack.
PhishTank SiteChecker - SiteChecker blocks phishing web sites based on data from the PhishTack community. When you visit a web site known to PhishTank as a phishing web site, SiteChecker will display a block page instead of the phishing web page. Download PhishTank SiteChecker.
Google Safe Browsing - Google Safe Browsing alerts you if a web page that you visit appears to be asking for your personal or financial information under false pretences (phishing web sites). By combining advanced algorithms with reports about misleading pages from a number of sources, Google Safe Browsing is often able to automatically warn you when you encounter a page that’s trying to trick you into disclosing personal information. Download Google Safe Browsing.
WOT -WOT helps you steer clear of online fraud and phishing web sites, by allowing you to see web sites reputations on your browser. By knowing the reputation of a web site, it becomes easier to avoid accessing phishing web sites. The reputations are taken from testimonies contributed by the WOT community. Download WOT.
Verisign EV Green Bar - This extension adds extended validation certificate support to your browser. When you access a secure web site, the address bar turns green and displays certificate owner and certification authority. This extension is extremely useful to determine whether a web site is phony. Download Verisign EV Green Bar.
iTrustPage - iTrustPage prevents Internet users from filling out untrustworthy web forms. When visiting a web site that has a web form, iTrustPage computes the TrustScore for the form page. When the score is high, iTrustPage deems the web page as trustworthy; otherwise it is untrustworthy. Download iTrustPage.
Finjan SecureBrowsing - Finjan SecureBrowsing checks links in search results and websites and warns you of potentially malicious links. It performs real-time code analysis of the current content on each web page. It detects potentially malicious code and undesirable behavior. Each link is marked as safe (green) or potentially dangerous (red). Download Finjan SecureBrowsing.
FirePhish - FirePhish warns you whenever you surf to a site which is known as a phishing site or has suspicious characteristics. Download FirePhish.
CallingID Link Advisor - CallingID Link Advisor verifies that links you see are safe before you follow them. When the mouse is placed over any link, a risk assessment and the full details of the site owner are displayed, helping you decide whether the site is trustworthy. CallingID Link Advisor also warns you of links to sites that are known as phishing sites. Download CallingID Link Advisor.
SpoofStick - SpoofStick makes it easier to spot a spoofed website by prominently displaying only the most relevant domain information. Download SpoofStick.
TrustBar - TrustBar allows users to assign a favorite name or logo for each web site. This makes it easy to detect fake, cloned sites, from phishing, spoofing, pharming and other attacks. Download TrustBar.
SafePasswd - Generate secure passwords online
SafePasswd is a free online web site that helps users generate memorable, secure passwords for use on web sites, business systems, or any other place that may need a password. You can choose various characteristics of a good password and visually see how effective a password is.
WirelessKeyView - Recover WEP and WPA keys
WirelessKeyView is a free utility to recover all wireless keys (WEP and WPA) stored on your computer. It allows you to easily save all keys to text/html/xml file, or copy a single key to the clipboard. WirelessKeyView supports both Windows XP Wireless Zero Configuration service and Windows Vista WLAN AutoConfig service.


Download the latest version of WirelessKeyView here.
4/22/08
5 Essential laptop security tips
Laptop theft is a huge problem. It is common nowadays to use a laptop to get work done away from your home or office. Unfortunately, the mobility and technology that make laptops so valuable also make them the target for theft around the world.
If your laptop is stolen, company information can be exposed, as well as your personal information can lead to identity theft. In this hack, we’ll show you 5 essential tips to learn how you can keep your laptop more secure.
If your laptop is stolen, company information can be exposed, as well as your personal information can lead to identity theft. In this hack, we’ll show you 5 essential tips to learn how you can keep your laptop more secure.
- Tip #1: Never leave any passwords in your laptop case. If you do keep your passwords with your laptop, it’s much like keeping the keys in your car. Remember that without your passwords, it will be more difficult to unlock your computer and access your personal information.
- Tip #2: Laptop theft is a crime of opportunity. Always take your laptop with you, and always keep your eye on it. For instance, if you’re meeting someone, lock your laptop in the trunk and make sure it’s stored out of the sight. Further more, try not to leave your laptop in an accessible area, such as your hotel’s front desk. If you do have a safe or a security cable, use it.
- Tip #3: Have sensitive data? Encrypt it. If someone gets your laptop and gains access to your files, encryption can give you an extra layer of protection. Programs such as TrueCrypt make the job very easy. Windows users can use Encrypted File System (EFS) to encrypt files and folders.
- Tip #4: Password protect your systems. Every laptop user should protect their laptop with startup passwords. Set a BIOS password to lock the system before the operating system even starts. Windows users can set a password to start Windows. Remember that startup passwords will prohibit any access to the computer at all.
Make sure you choose a good password - make it a long one and complex. Only hard-to-guess passwords will prevent thieves from guessing your password. If your laptop supports biometric authentication, you should use your fingerprint in place of a password. - Tip #5: If the worse happens, and your laptop does get stolen, wouldn’t it be great if you could trace it? There are companies that offer tracking software, allowing the stolen laptop to send its location (for example, LaptopLock). Unfortunately, those programs work only when the stolen laptop connects to the Internet.
Use these 5 tips to keep your laptop more secure when you’re on the road and off the house or work.
Essential Bluetooth hacking tools
Bluetooth technology is great. No doubt. It provides an easy way for a wide range of mobile devices to communicate with each other without the need for cables or wires. However, despite its obvious benefits, it can also be a potential threat for the privacy and security of Bluetooth users (remember Paris Hilton?).
If you are planning to gain a deeper understanding of Bluetooth security, you will need a good set of tools with which to work. By familiarizing yourself with the following tools, you will not only gain a knowledge of the vulnerabilities inherent in Bluetooth-enabled devices, but you will also get a glimpse at how an attacker might exploit them.
This hack highlights the essential tools, mostly for the Linux platform, that can be used to search out and hack Bluetooth-enabled devices.
Discovering Bluetooth Devices
BlueScanner - BlueScanner searches out for Bluetooth-enabled devices. It will try to extract as much information as possible for each newly discovered device. Download BlueScan.
BlueSniff - BlueSniff is a GUI-based utility for finding discoverable and hidden Bluetooth-enabled devices. Download BlueSniff.
BTBrowser - Bluetooth Browser is a J2ME application that can browse and explore the technical specification of surrounding Bluetooth-enabled devices. You can browse device information and all supported profiles and service records of each device. BTBrowser works on phones that supports JSR-82 - the Java Bluetooth specification. Download BTBrowser.
BTCrawler -BTCrawler is a scanner for Windows Mobile based devices. It scans for other devices in range and performs service query. It implements the BlueJacking and BlueSnarfing attacks. Download BTCrawler.
Hacking Bluetooth Devices
BlueBugger -BlueBugger exploits the BlueBug vulnerability. BlueBug is the name of a set of Bluetooth security holes found in some Bluetooth-enabled mobile phones. By exploiting those vulnerabilities, one can gain an unauthorized access to the phone-book, calls lists and other private information. Download BlueBugger.
CIHWB - Can I Hack With Bluetooth (CIHWB) is a Bluetooth security auditing framework for Windows Mobile 2005. Currently it only support some Bluetooth exploits and tools like BlueSnarf, BlueJack, and some DoS attacks. Should work on any PocketPC with the Microsoft Bluetooth stack. Download CIHWB.
Bluediving - Bluediving is a Bluetooth penetration testing suite. It implements attacks like Bluebug, BlueSnarf, BlueSnarf++, BlueSmack, has features such as Bluetooth address spoofing, an AT and a RFCOMM socket shell and implements tools like carwhisperer, bss, L2CAP packetgenerator, L2CAP connection resetter, RFCOMM scanner and greenplaque scanning mode. Download Bluediving.
Transient Bluetooth Environment Auditor - T-BEAR is a security-auditing platform for Bluetooth-enabled devices. The platform consists of Bluetooth discovery tools, sniffing tools and various cracking tools. Download T-BEAR.
Bluesnarfer - Bluesnarfer will download the phone-book of any mobile device vulnerable to Bluesnarfing. Bluesnarfing is a serious security flow discovered in several Bluetooth-enabled mobile phones. If a mobile phone is vulnerable, it is possible to connect to the phone without alerting the owner, and gain access to restricted portions of the stored data. Download Bluesnarfer.
BTcrack - BTCrack is a Bluetooth Pass phrase (PIN) cracking tool. BTCrack aims to reconstruct the Passkey and the Link key from captured Pairing exchanges. Download BTcrack.
Blooover II - Blooover II is a J2ME-based auditing tool. It is intended to serve as an auditing tool to check whether a mobile phone is vulnerable. Download Blooover II.
BlueTest - BlueTest is a Perl script designed to do data extraction from vulnerable Bluetooth-enabled devices. Download BlueTest.
BTAudit - BTAudit is a set of programs and scripts for auditing Bluetooth-enabled devices. Download BTAuding.
What’s next? Let everyone know to disable Bluetooth until they really need it. Additionally, make sure to update your phone software on a regular basis.
Bluetooth Security Tips
- Disable Bluetooth when you are not using it - Unless you are actively transferring information from one device to another, disable the technology to prevent unauthorized people from accessing it.
- Use Bluetooth in "hidden" mode - When you do have Bluetooth enabled, make sure it is "hidden," not "discoverable." The hidden mode prevents other Bluetooth devices from recognizing your device. This does not prevent you from using your Bluetooth devices together. You can "pair" devices so that they can find each other even if they are in hidden mode. Although the devices (for example, a mobile phone and a headset) will need to be in discoverable mode to initially locate each other, once they are "paired" they will always recognize each other without needing to rediscover the connection.
- Be careful where you use Bluetooth - Be aware of your environment when pairing devices or operating in discoverable mode. For example, if you are in a public wireless "hotspot," there is a greater risk that someone else may be able to intercept the connection than if you are in your home or your car.
- Evaluate your security settings - Most devices offer a variety of features that you can tailor to meet your needs and requirements. However, enabling certain features may leave you more vulnerable to being attacked, so disable any unnecessary features or Bluetooth connections. Examine your settings, particularly the security settings, and select options that meet your needs without putting you at increased risk. Make sure that all of your Bluetooth connections are configured to require a secure connection.
- Take advantage of security options - Learn what security options your Bluetooth device offers, and take advantage of features like authentication and encryption.
- When pairing devices for the first time, do so in private at home or in the office and avoid public places;
- Always use an eight character alphanumeric PIN (personal identification number) code as the minimum. The more characters within the code, the more difficult it is to crack;
- If your devices become unpaired in a public place, wait until you are in a private, secure location before re-pairing them.
Layer 2 Attacks
The OSI stack was conceived so that different layers are able to function independently (with only the knowledge of their mutual interfaces). This allows for flexibility in that developments for a given layer of the protocol stack do not impact other layers so long as the standard interface between the layers is maintained.
Unfortunately this also means that if one layer is hacked, communication may be compromised without the other layers being aware of the problem (as shown in Below Figure).
 OSI Stack Structure
What Are the Possible Attacks in a VLAN-Based Network?
The majority of attacks at L2 exploit the inability of a device to track the attacker who can therefore perform undetected malicious actions on the forwarding path to alter it and then exploit the change.
These are the most talked-about L2 attacks and incidentally also the ones that @stake documented in its findings [1]:
•MAC Flooding Attack
•802.1Q and ISL Tagging Attack
•Double-Encapsulated 802.1Q/Nested VLAN Attack
•ARP Attacks
•Private VLAN Attack
•Multicast Brute Force Attack
•Spanning-Tree Attack
•Random Frame Stress Attack
A description of each of these threats follows.
MAC Flooding Attack
This is not properly a network "attack" but more a limitation of the way all switches and bridges work. They possess a finite hardware learning table to store the source addresses of all received packets: when this table becomes full, the traffic that is directed to addresses that cannot be learned anymore will be permanently flooded. Packet flooding however is constrained within the VLAN of origin, therefore no VLAN hopping is permitted.
This corner case behavior can be exploited by a malicious user that wants to turn the switch he or she is connected to into a dumb pseudo-hub and sniff all the flooded traffic. Several programs are available to perform this task: for example macof, part of the dsniff suite [4]. This weakness can then be exploited to perform an actual attack, like the ARP poisoning attack (see ARP Attacks for more details on the subject).
On non intelligent switches this problem arises because a sender's L2 identity is not checked, therefore the sender is allowed to impersonate an unlimited number of devices simply by counterfeiting packets.
Cisco's switches support a variety of features whose only goal is to identify and control the identities of connected devices. The security principle on which they are based is very simple: authentication and accountability are critical for all untrusted devices.
In particular, Port Security, 802.1x, and Dynamic VLANs are three features that can be used to constrain the connectivity of a device based on its user's login ID and based on the device's own MAC layer identification.
With Port Security, for instance, preventing any MAC flooding attack becomes as simple as limiting the number of MAC addresses that can be used by a single port: the identification of the traffic of a device is thereby directly tied to its port of origin.
ISL is a Cisco proprietary technology and is in a sense a compact form of the extended packet header used inside the device: since every packet always gets a tag, there is no risk of identity loss and therefore of security weaknesses.
On the other hand, the IEEE committee that defined 802.1Q decided that because of backward compatibility it was desirable to support the so-called native VLAN, that is to say, a VLAN that is not associated explicitly to any tag on an 802.1Q link. This VLAN is implicitly used for all the untagged traffic received on an 802.1Q capable port.
This scenario is to be considered a misconfiguration, since the 802.1Q standard does not necessarily force the users to use the native VLAN in these cases. As a matter of fact, the proper configuration that should always be used is to clear the native VLAN from all 802.1Q trunks (alternatively, setting them to 802.1q-all-tagged mode achieves the exact same result). In cases where the native VLAN cannot be cleared, then always pick an unused VLAN as native VLAN of all the trunks; don't use this VLAN for any other purpose. Protocols like STP, DTP, and UDLD should be the only rightful users of the native VLAN and their traffic should be completely isolated from any data packet.
Therefore, it is absolutely normal for two hosts in an Isolated VLAN to fail to communicate with each other through direct L2 communication and instead to succeed to talk to each other by using the router as a packet relay.
In @stake's results, this type of attack proved ineffective against Cisco Catalyst switches because they correctly contained all the frames within their appropriate broadcast domain (no surprise here: after all, in all Catalyst switches broadcasts are just special cases of multicasts).
Spanning-Tree Attack
Another attack that tries to leverage a possible switch weakness (for example, bug) is the STP attack. All of the Cisco Catalyst switches tested by @stake support this protocol. By default, STP is turned on and every port on the switch both speaks and listens for STP messages. @stake tried to see if Cisco PVST (Per VLAN Spanning Tree) would fail open across1 multiple VLANs under specific conditions. The attack consisted in sniffing for STP frames on the wire to get the ID of the port STP was transmitting on. Next, the attacker would begin sending out STP Configuration/Topology Change Acknowledgement BPDUs announcing that he was the new root bridge with a much lower priority.
Random Frame Stress Attack
This last test can have many incarnations but in general it consists in a brute force attack that randomly varies several fields of a packet while keeping only the source and destination addresses constant. After repetitive testing by @stake's engineers, no packets were found to have successfully hopped VLANs.
Private VLANs can be used in this context to better isolate hosts at L2 and shield them from unwanted malicious traffic from untrustworthy devices. Communities of mutually-trusting hosts can be created so as to partition a L2 network into subdomains where only friendly devices are allowed to communicate with each other.
Unfortunately this also means that if one layer is hacked, communication may be compromised without the other layers being aware of the problem (as shown in Below Figure).
 OSI Stack Structure
The Data Link layer is as vulnerable as any other layer and can be subjected to a variety of attacks which the switch must be configured to protect against.
What Are the Possible Attacks in a VLAN-Based Network?
The majority of attacks at L2 exploit the inability of a device to track the attacker who can therefore perform undetected malicious actions on the forwarding path to alter it and then exploit the change.
These are the most talked-about L2 attacks and incidentally also the ones that @stake documented in its findings [1]:
•MAC Flooding Attack
•802.1Q and ISL Tagging Attack
•Double-Encapsulated 802.1Q/Nested VLAN Attack
•ARP Attacks
•Private VLAN Attack
•Multicast Brute Force Attack
•Spanning-Tree Attack
•Random Frame Stress Attack
A description of each of these threats follows.
MAC Flooding Attack
This is not properly a network "attack" but more a limitation of the way all switches and bridges work. They possess a finite hardware learning table to store the source addresses of all received packets: when this table becomes full, the traffic that is directed to addresses that cannot be learned anymore will be permanently flooded. Packet flooding however is constrained within the VLAN of origin, therefore no VLAN hopping is permitted.
This corner case behavior can be exploited by a malicious user that wants to turn the switch he or she is connected to into a dumb pseudo-hub and sniff all the flooded traffic. Several programs are available to perform this task: for example macof, part of the dsniff suite [4]. This weakness can then be exploited to perform an actual attack, like the ARP poisoning attack (see ARP Attacks for more details on the subject).
On non intelligent switches this problem arises because a sender's L2 identity is not checked, therefore the sender is allowed to impersonate an unlimited number of devices simply by counterfeiting packets.
Cisco's switches support a variety of features whose only goal is to identify and control the identities of connected devices. The security principle on which they are based is very simple: authentication and accountability are critical for all untrusted devices.
In particular, Port Security, 802.1x, and Dynamic VLANs are three features that can be used to constrain the connectivity of a device based on its user's login ID and based on the device's own MAC layer identification.
With Port Security, for instance, preventing any MAC flooding attack becomes as simple as limiting the number of MAC addresses that can be used by a single port: the identification of the traffic of a device is thereby directly tied to its port of origin.
802.1Q and ISL Tagging Attack
Tagging attacks are malicious schemes that allow a user on a VLAN to get unauthorized access to another VLAN. For example, if a switch port were configured as DTP auto and were to receive a fake DTP packet, it might become a trunk port and it might start accepting traffic destined for any VLAN. Therefore, a malicious user could start communicating with other VLANs through that compromised port.
Tagging attacks are malicious schemes that allow a user on a VLAN to get unauthorized access to another VLAN. For example, if a switch port were configured as DTP auto and were to receive a fake DTP packet, it might become a trunk port and it might start accepting traffic destined for any VLAN. Therefore, a malicious user could start communicating with other VLANs through that compromised port.
Sometimes, even when simply receiving regular packets, a switch port may behave like a full-fledged trunk port (for example, accept packets for VLANs different from the native), even if it is not supposed to. This is commonly referred to as "VLAN leaking"
While the first attack can be prevented very easily by setting DTP to off on all non trusted ports (again the principle of trust at work...), the second attack can usually be addressed by following simple configuration guidelines (such as the one suggested in the next section) or with software upgrades. Fortunately, Cisco Catalyst 2950, Catalyst 3550, Catalyst 4000, and Catalyst 6000 series switches don't need any such upgrade, since their software and hardware have been designed to always enforce proper traffic classification and isolation on all their ports .
Double-Encapsulated 802.1Q/Nested VLAN Attack
While internal to a switch, VLAN numbers and identification are carried in a special extended format that allows the forwarding path to maintain VLAN isolation from end to end without any loss of information. Instead, outside of a switch, the tagging rules are dictated by standards such as ISL or 802.1Q.
While internal to a switch, VLAN numbers and identification are carried in a special extended format that allows the forwarding path to maintain VLAN isolation from end to end without any loss of information. Instead, outside of a switch, the tagging rules are dictated by standards such as ISL or 802.1Q.
ISL is a Cisco proprietary technology and is in a sense a compact form of the extended packet header used inside the device: since every packet always gets a tag, there is no risk of identity loss and therefore of security weaknesses.
On the other hand, the IEEE committee that defined 802.1Q decided that because of backward compatibility it was desirable to support the so-called native VLAN, that is to say, a VLAN that is not associated explicitly to any tag on an 802.1Q link. This VLAN is implicitly used for all the untagged traffic received on an 802.1Q capable port.
This capability is desirable because it allows 802.1Q capable ports to talk to old 802.3 ports directly by sending and receiving untagged traffic. However, in all other cases, it may be very detrimental because packets associated with the native VLAN lose their tags, for example, their identity enforcement, as well as their Class of Service (802.1p bits) when transmitted over an 802.1Q link.
For these sole reasons—loss of means of identification and loss of classification—the use of the native VLAN should be avoided. There is a more subtle reason, though.
When double-encapsulated 802.1Q packets are injected into the network from a device whose VLAN happens to be the native VLAN of a trunk, the VLAN identification of those packets cannot be preserved from end to end since the 802.1Q trunk would always modify the packets by stripping their outer tag. After the external tag is removed, the internal tag permanently becomes the packet's only VLAN identifier. Therefore, by double-encapsulating packets with two different tags, traffic can be made to hop across VLANs.
This scenario is to be considered a misconfiguration, since the 802.1Q standard does not necessarily force the users to use the native VLAN in these cases. As a matter of fact, the proper configuration that should always be used is to clear the native VLAN from all 802.1Q trunks (alternatively, setting them to 802.1q-all-tagged mode achieves the exact same result). In cases where the native VLAN cannot be cleared, then always pick an unused VLAN as native VLAN of all the trunks; don't use this VLAN for any other purpose. Protocols like STP, DTP, and UDLD should be the only rightful users of the native VLAN and their traffic should be completely isolated from any data packet.
ARP Attacks
The ARP protocol is quite an old technology. The ARP RFC is from a time when everyone in a network was supposed to be "friendly" and therefore there was no security built into the ARP function. As a consequence, anyone can claim to be the owner of any IP address they like. To be more precise, anyone can claim that his or her MAC address is associated to any IP address within a specific subnet. This is possible because ARP requests or replies carry the information about the L2 identity (MAC address) and the L3 identity (IP address) of a device and there is no verification mechanism of the correctness of these identities.
The ARP protocol is quite an old technology. The ARP RFC is from a time when everyone in a network was supposed to be "friendly" and therefore there was no security built into the ARP function. As a consequence, anyone can claim to be the owner of any IP address they like. To be more precise, anyone can claim that his or her MAC address is associated to any IP address within a specific subnet. This is possible because ARP requests or replies carry the information about the L2 identity (MAC address) and the L3 identity (IP address) of a device and there is no verification mechanism of the correctness of these identities.
Again, this is another case where lack of a precise and reliable means of identification of a device leads to a serious security vulnerability. Also, this is a perfect example of why by compromising a lower level in the OSI stack it's possible to directly affect an upper level without the upper layer being aware of the problem. (ARP is a unique specimen of protocol living and breathing in the L2 world but logically residing at the boundary between the Data Link and the Network layer in the OSI stack.)
The ARP attacks that @stake performed were targeted to fool a switch into forwarding packets to a device in a different VLAN by sending ARP packets containing appropriately forged identities. However, in all Cisco devices VLANs are orthogonal to and therefore independent from MAC addresses: so by changing a device's identity in an ARP packet, it's not possible to affect the way it communicates with other devices across VLANs. As a matter of fact, as the report states, any VLAN hopping attempt was thwarted.
On the other hand, within the same VLAN, the so-called ARP poisoning or ARP spoofing attacks are a very effective way to fool end stations or routers into learning counterfeited device identities: this can allow a malicious user to pose as intermediary and perform a Man-In-the-Middle (MiM) attack.
The MiM attack is performed by impersonating another device (for example, the default gateway) in the ARP packets sent to the attacked device: these packets are not verified by the receiver and therefore they "poison" its ARP table with forged information.
This type of attack can be prevented either by blocking the direct communication at L2 between the attacker and the attacked device or by embedding more intelligence into the network so that it can check the forwarded ARP packets for identity correctness. The former countermeasure can be achieved with Cisco Catalyst Private VLANs or Private VLAN Edge features. The latter can be achieved by using a new feature called ARP Inspection, available first in CatOS 7.5 on the Cisco Catalyst 6500 Supervisor Engine II and a little later also in the Cisco IOS Software for the Cisco Catalyst switches.
Private VLAN Attack
"Private VLAN attack" is actually a misnomer because it corresponds not to a vulnerability but rather to the expected behavior of the feature. Private VLANs is a L2 feature and therefore it is supposed to isolate traffic only at L2. On the other hand, a router is a Layer 3 (L3) device and when it's attached to a Private VLAN promiscuous port it is supposed to forward L3 traffic received on that port to whatever destination it is meant to, even if it's in the same subnet as the source (@stake refers to this behavior as Layer 2 Proxy).
"Private VLAN attack" is actually a misnomer because it corresponds not to a vulnerability but rather to the expected behavior of the feature. Private VLANs is a L2 feature and therefore it is supposed to isolate traffic only at L2. On the other hand, a router is a Layer 3 (L3) device and when it's attached to a Private VLAN promiscuous port it is supposed to forward L3 traffic received on that port to whatever destination it is meant to, even if it's in the same subnet as the source (@stake refers to this behavior as Layer 2 Proxy).
Therefore, it is absolutely normal for two hosts in an Isolated VLAN to fail to communicate with each other through direct L2 communication and instead to succeed to talk to each other by using the router as a packet relay.
As with regular routed traffic, packets relayed through L2 Proxy can be filtered, if desired, through the configuration of an appropriate ACL on the forwarding device.
Here is a simple example of output Cisco IOS ACL to block the relayed traffic:
deny subnet/mask subnet/mask
permit any subnet/mask
deny any any
deny subnet/mask subnet/mask
permit any subnet/mask
deny any any
Multicast Brute Force Attack
This attack tries to exploit switches' potential vulnerabilities (read: bugs) against a storm of L2 multicast frames. @stake's test was designed to ascertain what happens when a L2 switch receives lots of L2 multicast frames in rapid succession. The correct behavior should be to constrain the traffic to its VLAN of origin, the failure behavior would be to leak frames to other VLANs.
This attack tries to exploit switches' potential vulnerabilities (read: bugs) against a storm of L2 multicast frames. @stake's test was designed to ascertain what happens when a L2 switch receives lots of L2 multicast frames in rapid succession. The correct behavior should be to constrain the traffic to its VLAN of origin, the failure behavior would be to leak frames to other VLANs.
In @stake's results, this type of attack proved ineffective against Cisco Catalyst switches because they correctly contained all the frames within their appropriate broadcast domain (no surprise here: after all, in all Catalyst switches broadcasts are just special cases of multicasts).
Spanning-Tree Attack
Another attack that tries to leverage a possible switch weakness (for example, bug) is the STP attack. All of the Cisco Catalyst switches tested by @stake support this protocol. By default, STP is turned on and every port on the switch both speaks and listens for STP messages. @stake tried to see if Cisco PVST (Per VLAN Spanning Tree) would fail open across1 multiple VLANs under specific conditions. The attack consisted in sniffing for STP frames on the wire to get the ID of the port STP was transmitting on. Next, the attacker would begin sending out STP Configuration/Topology Change Acknowledgement BPDUs announcing that he was the new root bridge with a much lower priority.
During this procedure broadcast traffic was injected by the testers to discover any possible VLAN leaks, but none were found. This is an indication of the robustness of STP's implementations on Cisco switches.
Random Frame Stress Attack
This last test can have many incarnations but in general it consists in a brute force attack that randomly varies several fields of a packet while keeping only the source and destination addresses constant. After repetitive testing by @stake's engineers, no packets were found to have successfully hopped VLANs.
Private VLANs can be used in this context to better isolate hosts at L2 and shield them from unwanted malicious traffic from untrustworthy devices. Communities of mutually-trusting hosts can be created so as to partition a L2 network into subdomains where only friendly devices are allowed to communicate with each other.
simple guide to help keep your computer secure
You probably have important personal information stored on your computer. So it needs to be protected, especially if your computer can send or receive e-mails or access the Internet.
What stops a computer from being secure? Switching it on! Fortunately, just like protecting the contents of your home by locking the door, there are some simple things you can do to protect the contents of your computer. This guide tells you how you can protect your important and personal information by following eight sets of suggested actions.
Stop Viruses & Worms:
A virus is a computer program that propagates itself by modifying or exploiting other programs to copy it to other files or systems. They usually move from computer to computer by attaching themselves to files or to disks. The most common method of infection is through e-mail attachments or through files downloaded from the Internet, although viruses can also be transferred via floppy disk or Internet Relay Chat (IRC) communications. Many viruses delete or corrupt a selection of files or the whole file system on computers infected with them. Recently, there has been an increase in the number of network worms detected on the Internet. Worms are like viruses but use network vulnerabilities rather than user actions to propagate themselves from system to system.
Useful Tips:
- Do not open any email attachments or files if you are unsure of suspicious about who sent them.
- Do not open any e-mail attachments or files unless you know what they are, even if you know the sender. Some viruses send themselves automatically to the e-mail addresses in the infected users address book.
- Be very careful about downloading files from the Internet. If your unsure about the source - don't do it.
- If you do not have anti-virus software, it is HIGHLY RECOMMENDED that you obtain and install anti-virus software on your computer and set it to check all files as they come into your computer.
- Keep the anti-virus software actively monitoring your computer at all times.
- Update your anti-virus software, every two weeks at a minimum, according to instructions from the vendor. It's important to do this because the vendor's master virus databases are frequently updated to include the unique "signatures" of new viruses.
- Check the hard drive at least every month for viruses that were not detected by the anti-virus monitor.
Install a Personal Firewall:
Whenever you're connected to the Internet you are at risk from hackers attempting to break into your computer. To add to the potential embarrassment, they might also use your computer to attack others. Installing a "personal firewall" makes this a lot less likely. A firewall is a software or hardware device that controls online access to and from a computer.
Useful Tips:
- Disconnect from the Internet when you're not using it.
- Have personal firewall software installed and running on your computer. There are good firewalls available for free on the Internet. To find one, use any search engine to search for "personal firewall".
- If the firewall you choose can, set it to block everything else except services and/or applications you'll be using to communicate over the Internet, for instance your Web browser and e-mail software.
- Keep up to date with software patches for your computer's operating system, any Internet applications and the firewall software.
Protect Your Files:
If other people have access to your computer, consider restricting access to the files you want to keep private.
Useful Tips:
- Turn the computer off when you're not using it.
- Set-up login accounts and file permissions, so only authorised users can access the system. Unix and Windows NT/2000 have these security functions built in. If you run Windows 95/98/Me, you can buy products to provide this protection. Configure the access restrictions to individual files or folders, so other users can only access the files you want them to.
- If you do not need to allow people on other computers to share your directories and printers ensure that those functions are disabled (e.g. Microsoft File Sharing and Printer Sharing).
- For laptop computers, consider setting a BIOS password so only authorised users can start the computer.
- If information privacy is imperative you should also consider using a file- or disk-encryption system on the sensitive files. Alternatively, you could retain the only copies of those files on removable media and store the media in a safe place.
Choose Effective Passwords:
Passwords mean protection. So when you choose a password, don't pick one that other people could easily guess such as your name, your partner's name or the brand name of the monitor.
Useful Tips:
- Select a password at least 8 characters long - a mixture of numbers and letters you can remember - but which has no meaning to anyone else. This is easier than it sounds. Just think of a phrase like "don't forget to lock-up the car" create an abbreviation, including a number for letters such as "d4g2lutc".
- DO NOT use the same password for different systems.
- DO NOT write your passwords down or send them in e-mail messages.
- You should change your password every 2-3 months.
- If you don't like passwords or need a stronger authentication system, consider installing a biometric device (such as one based on your voice or fingerprint), or a physical token system such as smart card or proximity card authentication.
Surf the Web Safely:
Java and ActiveX are programming languages that allow webpages to do all sorts of interactive and interesting things through small pieces of computer code known as 'applets'. Unfortunately, applets can also do damage on your computer if the creator of the webpage you are downloading has a nasty streak. For example, an applet could include code to delete your files, gather and pass back private information, or install a Trojan horse utility to set up a back door communications path into your computer.
Useful Tips:
- The safest option is to set your computer to ignore Java and ActiveX programming languages. Otherwise set your browser to ask you each time it is about to run Java and ActiveX code. Depending on what you know about the site, you will at least have the choice to run it, or not.
- Try to only visit sites that are reputable; do not run code from unknown sites.
Protect the Information You're Sending:
When you send information across the Internet it's possible other people may be able to capture and read it, or even change it. For most communications this probably isn't an issue, but if it is, consider using encryption.
Useful Tips:
- DO NOT send information that is private or sensitive (such as credit card details) to Web sites that do not use encryption between your browser and the site. One way to check for this is to see if "https" is on the address line or look for the key or padlock icon in your browser.
- Check to see if your e-mail program includes an encryption feature. Alternatively, use an encryption program such as Pretty Good Privacy (PGP) to manage encryption of e-mail amongst a small group of users. Note - if you encrypt your messages, the people you send them to will also need a compatible decryption program and cryptographic keys to read the message when they receive it.
Back It Up:
When you use a computer, there's always a risk of losing the information on it. Most common risks are from a virus, your computer hard drive crashing, or a power failure. To reduce the impact if such an event occurs you should make back-up copies of important data files as soon as possible after they have been created or changed.
Useful Tips:
- Back-up your important files to an external device or some form of reliable media.
- Back-up regularly and check that the back-up has worked properly!
- Protect back-up disks from damage and unauthorised access.
Wipe Out Old Files:
Before you lend or dispose of your computer, or get it serviced, make sure there's no private information left on it.
Useful Tips:
- At the very least DELETE all the files that you don't want others to see, empty all the temporary directories, and then empty the recycling/trash bin.
- OR reformat the hard disk - note that this will also remove the operating system and application software as well as the data files. The software will have to be reinstalled before the system will be usable again.
- Unfortunately, both these methods only modify the file cataloguing system, they don't overwrite the files - many computer buffs could still recover the information. So, for maximum protection, remove or wipe the hard drive using a disk cleaning utility. The most thorough cleaning utilities are those which overwrite every location on the disk. Those which only overwrite sectors of the disk not used by files are less thorough but should be sufficient if you delete all your private files first.
- Wipe or destroy CDs or floppy disks and other information storage tools, before you dispose of them or pass them on. The "MS Format" function can be used for floppy disks (DO NOT use the Quick Format option).
4/8/08
Router-Based Firewall Solution
The Cisco IOS Firewall feature set provides network security with integrated, inline security solutions. The IOS Firewall feature set is a suite of security services provisioning a single point of protection at the network perimeter. In addition, the IOS Firewall feature is widely available on a range of IOS software-based devices, thereby offering sophisticated security and policy enforcement for network connections.
The Cisco IOS Firewall feature is a stateful-inspection firewall engine with application-level intelligence. This provides dynamic control to permit or deny traffic flow, thereby providing enhanced security. In the simplest form, the principal function of a firewall is to monitor and filter traffic.
Cisco routers can be configured with the IOS Firewall feature in one of the following deployment scenarios:
- A firewall router facing the Internet.
- A firewall router to protect the internal network from the external network. An external network can be any network outside the organization (for example, a customer or a partner network).
- A firewall router between groups of networks in the internal network.
- A firewall router that provides secure connections to or from remote or branch offices.
Cisco IOS Software provides an extensive set of security features to design customized firewall solutions to fit an organization's security policy. A Cisco networking device running Cisco IOS Software can be configured to function as a firewall by using several solutions available in the IOS Firewall feature set.
The Cisco IOS Firewall consists of several major subsystems:
Cisco IOS Firewall stateful packet inspection (SPI): SPI provides true firewall capabilities to protect networks against unauthorized traffic and to control legitimate business-critical data.
Context-Based Access Control (CBAC): CBAC (now known as Classic Firewall) is a stateful-inspection firewall engine that provides dynamic traffic filtering functionality.
Intrusion Prevention System (IOS IPS) (formerly known as IOS IDS): Cisco IOS IPS offers integrated IPS functionality as part of the Cisco IOS Software. From IOS Version 12.3T, Cisco IOS IPS replaces the previous IOS IDS functionality by implementing a large part of classic sensor functionality as part of the IOS-based device. IOS IPS is an inline intrusion detection sensor that scans packets and sessions flowing through the router to identify any of the Cisco IOS IPS signatures that protect the network from internal and external threats.
Authentication proxy: The authentication proxy feature (also known as Proxy Authentication) allows security policy enforcement on a per-user basis. Earlier, user access and policy enforcement was associated with a user's IP address or a single global policy applied to an entire user group. With the authentication proxy feature, users can now be authenticated and authorized on a per-user policy with access control customized to an individual level.
Port-to-Application Mapping (PAM): PAM allows you to customize TCP or User Datagram Protocol (UDP) port numbers for network services or applications to nonstandard ports (for example, HTTP service using TCP port 8080 instead of the default port 80). CBAC inspection leverages this information to examine nonstandard application-layer protocols.
Network Address Translation (NAT): NAT hides internal IP addresses from networks that are external to the firewall. NAT was designed to provide IP address conservation and for internal IP networks that use the unregistered private address space per RFC 1918. NAT translates these private IP addresses into legal registered addresses as packets traverse through the NAT device. This provides a basic low-level security by effectively hiding the internal network from the outside world.
Zone-Based Policy Firewall (ZFW): ZFW is a new enhanced security tool available in the Cisco IOS Software-based firewall feature set. ZFW offers a completely revamped configuration syntax that offers network protection that uses intuitive policies and increased granularity to control unauthorized network access.
Several other security solutions are available on Cisco IOS. These include Lock-and-Key, Reflexive access list, TCP Intercept, IPsec, and AAA support.
Layer2 Security Checklist
A security checklist is an important document containing a summary of various guidelines and instructions for secure implementations. Layer2 security checklists can be viewed as templates for device lockdown and security implementation guidelines. You can use the following checklist as a quick summary and working guide to the cisco device security configuration.
- Manage the switches in a secure manner. For example, use SSH, authentication mechanism, access list, and set privilege levels.
- Restrict management access to the switch so that untrusted networks are not able to exploit management interfaces and protocols such as SNMP.
- Always use a dedicated VLAN ID for all trunk ports. Be skeptical; avoid using VLAN 1 for anything.
- Disable DTP on all non-trunking access ports.
- Deploy the Port Security feature to prevent unauthorized access from switching ports.
- Use the Private VLAN feature where applicable to segregate network traffic at Layer 2.
- Use MD5 authentication where applicable.
- Disable CDP where possible.
- Prevent denial-of-service attacks and other exploitation by disabling unused services and protocols.
- Shut down or disable all unused ports on the switch, and put them in a VLAN that is not used for normal operations.
- Use port security mechanisms to provide protection against a MAC flooding attack.
- Use port-level security features such as DHCP Snooping, IP Source Guard, and ARP security where applicable.
- Enable Spanning Tree Protocol features (for example, BPDU Guard, Loopguard, and Root Guard).
- Use Switch IOS ACLs and Wire-speed ACLs to filter undesirable traffic (IP and non-IP).
Control Plane Policing (CoPP) Feature
The Cisco Catalyst series switches offer a strong set of integrated security features, including the following:
hardware- and software-based CPU rate limiters (for DoS protection), user-based rate limiting, hardware-based MAC learning, uRPF check in hardware, TCP intercept hardware acceleration, and most important, the Control Plane Policing (CoPP) feature. CoPP is also supported on all Cisco Integrated Services Routers (ISRs). One of the main advantages is that most of these integrated security features are based on hardware and can be enabled concurrently with no performance penalty.
The traffic managed by a device can be divided into three functional components or planes:
The route processor is critical to network operation. Therefore any service disruption or security compromise to the route processor, and hence the control and management planes, can result in network outages that impact regular operations. For example, a DoS attack targeting the route processor typically involves high bursty traffic resulting in excessive CPU
utilization on the route processor. Such attacks can be devastating to network stability and availability. The bulk of traffic managed by the route processor is handled by way of the control and management planes.
The CoPP feature is used to protect the aforementioned control and management planes; to ensure stability, reachability, and availability and to block unnecessary or DoS traffic. CoPP uses a dedicated control plane configuration through the modular QoS CLI (MQC) to provide filtering and rate limiting capabilities for the control plane packets.
As mentioned earlier, the CoPP feature is available on all major Cisco router series including ISR.
Perform the following steps to configure and apply the CoPP feature:
Step 1. Define a packet classification criterion. There are a number of ways to categorize the type of traffic—for example, by using an access list or protocol or IP precedence values.
Code View:
Hostname(config)# class-map {traffic_class_name}
Hostname(config-cmap)# match {access-list protocol ip prec ip dscp vlan}
Step 2. Define a service policy. Note that flow policing is the only valid option available (as of this writing) in the policy map for CoPP.
Code View:
Hostname(config-pmap)# policy-map {service_policy_name}
Hostname(config-pmap)# class {traffic_class_name}
Hostname(config-pmap-c)# policeconform-action exceed-action
Step 3. Enter control plane configuration mode using the control-plane global command. In this CP submode, the service policies are attached to the control plane.
Hostname(config)# control-plane
Step 4. Apply QoS policy configured to the control plane.
Hostname(config-cp)# service-policy {input output} {service_policy_name}
hardware- and software-based CPU rate limiters (for DoS protection), user-based rate limiting, hardware-based MAC learning, uRPF check in hardware, TCP intercept hardware acceleration, and most important, the Control Plane Policing (CoPP) feature. CoPP is also supported on all Cisco Integrated Services Routers (ISRs). One of the main advantages is that most of these integrated security features are based on hardware and can be enabled concurrently with no performance penalty.
The traffic managed by a device can be divided into three functional components or planes:
- Data plane
- Management plane
- Control plane
The route processor is critical to network operation. Therefore any service disruption or security compromise to the route processor, and hence the control and management planes, can result in network outages that impact regular operations. For example, a DoS attack targeting the route processor typically involves high bursty traffic resulting in excessive CPU
utilization on the route processor. Such attacks can be devastating to network stability and availability. The bulk of traffic managed by the route processor is handled by way of the control and management planes.
The CoPP feature is used to protect the aforementioned control and management planes; to ensure stability, reachability, and availability and to block unnecessary or DoS traffic. CoPP uses a dedicated control plane configuration through the modular QoS CLI (MQC) to provide filtering and rate limiting capabilities for the control plane packets.
As mentioned earlier, the CoPP feature is available on all major Cisco router series including ISR.
Perform the following steps to configure and apply the CoPP feature:
Step 1. Define a packet classification criterion. There are a number of ways to categorize the type of traffic—for example, by using an access list or protocol or IP precedence values.
Code View:
Hostname(config)# class-map {traffic_class_name}
Hostname(config-cmap)# match {access-list protocol ip prec ip dscp vlan}
Step 2. Define a service policy. Note that flow policing is the only valid option available (as of this writing) in the policy map for CoPP.
Code View:
Hostname(config-pmap)# policy-map {service_policy_name}
Hostname(config-pmap)# class {traffic_class_name}
Hostname(config-pmap-c)# police
Step 3. Enter control plane configuration mode using the control-plane global command. In this CP submode, the service policies are attached to the control plane.
Hostname(config)# control-plane
Step 4. Apply QoS policy configured to the control plane.
Hostname(config-cp)# service-policy {input output} {service_policy_name}
Dynamic ARP Inspection (DAI)
Address Resolution Protocol (ARP) provides IP-to-MAC (32-bit IP address into a 48-bit Ethernet address) resolution. ARP operates at Layer 2 (the data-link layer) of the OSI model. ARP provides the translation mapping the IP address to the MAC address of the destination host using a lookup table (also known as the ARP cache).
Several types of attacks can be launched against a host or devices connected to Layer 2 networks by "poisoning" the ARP caches. A malicious user could intercept traffic intended for other hosts on the LAN segment and poison the ARP caches of connected systems by broadcasting forged ARP responses. Several known ARPbased attacks can have a devastating impact on data privacy, confidentiality, and sensitive information.
To block such attacks, the Layer 2 switch must have a mechanism to validate and ensure that only valid ARP requests and responses are forwarded. Dynamic ARP inspection is a security feature that validates ARP packets in a network. Dynamic ARP inspection determines the validity of packets by performing an IP-to-MAC address binding inspection stored in a trusted database, (the DHCP snooping binding database) before forwarding the packet to the appropriate destination.
Dynamic ARP inspection will drop all ARP packets with invalid IP-to-MAC address bindings that fail the inspection. The DHCP snooping binding database is built when the DHCP snooping feature is enabled on the VLANs and on the switch.
Note: Dynamic ARP inspection inspects inbound packets only; it does not check outbound packets.
Below Figure shows an example of an attacker attempting to spoof and hijack traffic for an important address (a default gateway in this example) by broadcasting to all hosts spoofing the MAC address of the router (using a gratuitous ARP). This will poison ARP cache entries (create an invalid ARP entry) on Host A and Host B, resulting in data being redirected to the wrong destination. Because of the poisoned entries, when Host A sends data destined for the router, it is incorrectly sent to the attacker instead. Dynamic ARP inspection locks down the IPMAC
mapping for hosts so that the attacking ARP is denied and logged.

The dynamic ARP Inspection (DAI) feature safeguards the network from many of the commonly known man-inthe-middle (MITM) type attacks. Dynamic ARP Inspection ensures that only valid ARP requests and responses are forwarded.
Below Figure illustrates the DAI feature in action and shows how the intruder is blocked on the untrusted port when it is trying to poison ARP entries. DAI in a DHCP Environment
As mentioned earlier, DAI relies on the entries in the DHCP snooping binding database to verify IP-to-MAC address bindings. Configure each secure interface as trusted using the ip arp inspection trust interface configuration command. The trusted interfaces bypass the ARP inspection validation checks, and all other packets are subject to inspection when they arrive on untrusted interfaces.
Enable DAI on a per-VLAN basis by using the ip arp inspection vlan [vlan-range] command from the global configuration command.
Below example shows how to configure an interface as trusted and how to enable DAI for VLANs 5 through 10.
Example:- DAI in a DHCP Environment Configuration Example
Switch(config)# interface GigabitEthernet1/0/1
Switch(config-if)# ip arp inspection trust
Switch(config)# ip arp inspection vlan 5-10
DAI in a Non-DHCP Environment
In non-DHCP environments, because there is no DHCP snooping binding database, the DAI can validate ARP packets against a user-defined ARP ACL to map hosts with a statically configured IP address to their MAC address.
Use the arp access-list [acl-name] command from the global configuration mode on the switch to define an ARP ACL and apply the ARP ACL to the specified VLANs on the switch.
Below Example shows how to configure an ARP ACL to permit ARP packets from host IP address 10.1.1.11 with MAC address 0011.0011.0011 and how to apply this ACL to VLAN 5 with the interface configured as untrusted.
Example: DAI in a Non-DHCP Environment Configuration Example
Switch(config)# arp access-list arpacl
Switch(config-arp-acl)# permit ip host 10.1.1.11 mac host 0011.0011.0011
Switch(config-arp-acl)# exit
Switch(config)# ip arp inspection filter arpacl vlan 5
Switch(config)# interface GigabitEthernet1/0/2
Switch(config-if)# no ip arp inspection trust
Use the show ip arp inspection vlan [vlan# or range] command to verify the configuration.
Rate Limiting Incoming ARP Packets
Because the switch CPU performs the DAI, there is a potential for an ARP flooding denial-of-service (DoS) attack resulting in performance degradation. To prevent this, ARP packets can be rate limited using the ip arp inspection limit command from the interface configuration mode to limit the rate of incoming ARP requests and responses. By default, 15 pps (packets per second) is allowed on untrusted interfaces; however, there is no limit on trusted interfaces. The burst interval is 1 second.
When the rate of incoming ARP packets exceeds the configured thresholds, the port is placed in the errordisabled state. The port will remain in this state until the user intervenes or the errdisable recovery cause arp-inspection interval [seconds] command is enabled, so that ports can automatically recover from this state after a specified timeout period.
Use the show ip arp inspection interfaces to display the trust state, the rate limit (pps stands for packets per second), and the burst interval configured for the interfaces.
Use the show ip arp inspection vlan [vlan# or range] command to display the DAI configuration and the operation state of the VLANs configured on the switch.
ARP Validation Checks
Specific additional checks can be performed on incoming ARP packets to validate the destination MAC address, the sender IP address in ARP requests, the target IP address in ARP responses, or the source MAC address. Use the ip arp inspection validate {[src-mac] [dst-mac] [ip]} command from the global configuration mode to enable these additional ARP validation checks.
Use the show ip arp inspection statistics command to display packet statistics on DAI-configured VLANs.
4/7/08
Dynamic Host Configuration Protocol (DHCP) Snooping
The DHCP Snooping feature provides network protection from rogue DHCP servers. It creates a logical firewall between untrusted hosts and DHCP servers. The switch builds and maintains a DHCP snooping table (also called DHCP binding database), shown in below Figure. In addition, the switch uses this table to identify and filter untrusted messages from the network. The switch maintains a DHCP binding database that keeps track of DHCP addresses that are assigned to ports, as well as filtering DHCP messages from untrusted ports. For incoming
packets received on untrusted ports, packets are dropped if the source MAC address does not match MAC in the binding table entry.

Below Figure illustrates the DHCP Snooping feature in action, showing how the intruder is blocked on the untrusted port when it tries to intervene by injecting a bogus DHCP response packet to a legitimate conversation between the DHCP client and server.

The DHCP Snooping feature can be configured for switches and VLANs. When enabled on a switch, the interface acts as a Layer 2 bridge, intercepting and safeguarding DHCP messages going to a Layer 2 VLAN. When enabled on a VLAN, the switch acts as a Layer 2 bridge within a VLAN domain.
For DHCP Snooping to function correctly, all DHCP servers connected to the switch must be configured as trusted interfaces. A trusted interface can be configured by using the ip dhcp snooping trust interface configuration command. All other DHCP clients connected to the switch and other ports receiving traffic from outside the network or firewall should be configured as untrusted by using the no ip dhcp snooping trust interface configuration command.
To configure the DHCP Snooping feature, first enable DHCP Snooping on a particular VLAN by using the ip dhcp snooping vlan [vlan-id] command in global configuration mode. (Repeat this command for multiple VLANs.)
Next, enable DHCP Snooping globally by using the ip dhcp snooping command from the global configuration mode. Both options must be set to enable DHCP snooping.
In Example below, the DHCP server is connected to the FastEthernet0/1 interface and is configured as a trusted port with a rate limit of 100 packets per second. The rate limit command ensures that a DHCP flood will not overwhelm the DHCP server. DHCP Snooping is enabled on VLAN 5 and globally activated.
Example: DHCP Snooping Configuration
Switch(config)# interface Fastethernet0/1
Switch(config-if)# ip dhcp snooping trust
Switch(config-if)# ip dhcp snooping limit rate 100
Switch(config-if)# exit
Switch(config)# ip dhcp snooping vlan 5
Switch(config)# ip dhcp snooping
Switch(config)# ip dhcp snooping information option
Use the show ip dhcp snooping command to display DHCP snooping settings. Use the show ip dhcp snooping binding command to display binding entries corresponding to untrusted ports.